Preparation of Organotypic Hippocampal Slice Cultures
I. INTRODUCTIONBrain slice cultures are prepared by cutting thin sections of brain tissue from neonatal animals and culturing them as intact slices of tissue rather than as dissociated cells. Like all culture methods, these preparations offer the advantages of (1) long-term survival; (2) precise control of the experimental conditions; (3) excellent accessibility for viral vectors, biolistic transfection, and other means of gene transfection; (4) survival of tissue from neonatal-lethal transgenic animals; and (5) excellent visibility of cells and subcellular structures for morphological and electrophysiological studies. Unlike cell cultures, however, these tissue slices retain many features of their organotypic organization, as has been described extensively (e.g., Zimmer and Gähwiler, 1984; Gähwiler, 1984; Gähwiler et al., 1997). This permits the identification of defined cell groups, the stimulation or lesioning of specific axonal pathways, and the formation of relatively normally sized synaptic connections (Debanne et al., 1995). Other advantages of the slice culture technique include the ability to coculture slices from different brain regions, thus facilitating the experimental manipulation of long-distance connections in vitro (e.g., Gähwiler et al., 1987), and the ability to induce conventional long-term potentiation (e.g., Debanne et al., 1994).
There are two variations of the technique that are in use currently. In the roller tube technique, pioneered by Gähwiler (1981), the slices are attached to glass coverslips and placed in sealed test tubes on a roller drum in a dry air incubator. In the membrane or interface technique, pioneered by Stoppini et al. (1991), the slices are placed on semipermeable membranes and grown statically in CO2 incubators. Primary differences between the two techniques are that the roller tube cultures generally become thinner than the membrane cultures, but may be slightly more demanding and time-consuming to prepare.
This article provides a concise description of the steps involved in preparing and maintaining hippocampal slice cultures. More details can be obtained in Gähwiler et al. (1998). Of course, many other brain structures can be cultured readily using these techniques. It is recommended that beginners start with the hippocampus, as it is large, easy to dissect, has a readily visible cell body layer, and has proven to be robust when cultured with these methods.
II. SOLUTIONS
Keep all solutions refrigerated until use. Maintain sterility.
-
Roller tube culture medium:
100ml basal medium Eagle (GIBCO, product # 21010)
50 ml Hank's balanced salt solution (HBSS) with Earle's salts (GIBCO, product # 24020) or Hanks' balanced salt solution without phenol red for fluorescence applications (GIBCO product # 14025 or Cellgro, product # MT21-023-CV)
50ml horse serum (GIBCO, heat inactivated previously at 56°C for 30min in a water bath, product # 16050)
4 ml 50% glucose solution, and
1 ml 200mM glutamine (from frozen aliquots) - Membrane culture medium:
100ml MEM with Hank's salts and glutamine (GIBCO product # 11575)
50ml HBSS as described earlier
50ml horse serum as described earlier
1 ml penicillin/streptomycin solution (Sigma product # P-4333)
1 g HEPES
1 ml 50% glucose solution - HBSS + glucose:
500 ml Hanks' balanced salt solution and
6 ml 50% glucose solution - HBSS + glucose + kynurenate:
50ml HBSS + glucose and
0.5 ml 300 µM kynurenate stock solution - Chicken plasma: There is variability in the amount and type of anticoagulants contained in commercial plasmas. We recommend lyophilized chicken plasma from Cocalico Biologicals (product # 30-0390L). Reconstitute to appropriate volume with tissue culture water. Centrifuge for 18-20 min at 2500 rpm.
- Thrombin: Prepare aliquots at 150 units/ml. Store frozen. Add 0.75 ml HBSS + glucose to 1 ml aliquot of thrombin. This dilution can be adjusted to modify the firmness of the plasma clot (see later).
- Antimitotics: 3mg each of cytosine-β-D-arabinofuranoside, uridine, and 5-fluoro-2'-deoxyuridine in 100ml HBSS. Aliquot and freeze.
III. MATERIALS
A. Coverslips
Purchase 12 × 24-mm coverslips of 0/1 thickness. Place coverslips individually in the bottom of a large glass dish. Fill the dish with enough 95% ethanol to cover the coverslips. Soak them overnight. Replace the 95 % ethanol with 100% ethanol and soak overnight. Let the coverslips dry overnight with the dish covered with a paper towel. Transfer the coverslips to a petri dish, wrap in aluminum foil, and bake at 200°C for 4-8 h.
B. Membrane Culture Dishes
Corning Costar Transwell polyester membrane inserts and multiwell dishes (product # 3460) (also available with various substrate coatings). Millipore Millicell membrane inserts can also be used.
C. Instruments
Small (ca. 3-cm blades) surgical scissors (1×)
Large (ca. 5-cm blade) surgical scissors (1×)
Scalpel or holder for razor blade shards (1×)
Small (ca. 3 × 20-mm) flat spatulas (6×)
Curved surgical forceps (1×)
Alcohol lamp (1×)
D. Plasticware
Aclar plastic (Ted Pella, Inc., product # 10501-25) (Cut into 4 × 4-cm squares.)
Culture tubes (Nunclon Flat sided TC tubes, 110× 16mm)
Petri dishes (60 × 15 and 35 × 10mm)
E. Roller Drum and Drive Unit
Available from Bellco Glass (product # 7736-10164 and -20351). Set tilt angle to ca. 12° and rotation to ca. 10rpm.
F. Tissue Chopper
McIlwain Mechanical Tissue Chopper (Brinkmann Instr., product # 023401002).
IV. PROCEDURES
A. Prior to Dissection
Day before Culturing
- Set out three 150-ml glass beakers with distilled water, 70% ethanol, and 95% ethanol. Turn on hood and light alcohol lamp.
- Sterilize instruments by dunking in 70% ethanol and then in 95% ethanol. Large scissors and spatulas should be flamed in the alcohol lamp after removing from 95% ethanol.
- Fill culture tubes with 750µl of medium. Seal and store refrigerated.
- Sterilize one aclar sheet for each animal by dunking in 70% ethanol and then in 95% ethanol. Allow to dry on sterile gauze pads in the hood.
- Break a double-edged razor blade in half, wipe with 95% ethanol, and insert into the tissue chopper. Swab the stage and mounted blade with 95% ethanol.
- Set the micrometer on the chopper for the desired slice thickness (start with 400µm). Set blade force (start at the "9 o'clock" position).
- Thaw and prepare thrombin and chicken plasma.
- Fill one 60 × 15-mm petri dish with HBSS + glucose solution to cover the bottom of the dish. These dishes are used for the dissected hippocampi. One dish is needed for each animal to be dissected. Store in a refrigerator.
- Fill one 35 × 10-mm petri dish with HBSS + glucose + kynurenate to cover the bottom of the dish. These dishes are for the cut slices. One dish is needed for each animal to be dissected. Store in a refrigerator.
B. Tissue Dissection
- Mount an aclar sheet on the chopper stage.
- Place a 60mm × 15-mm petri dish containing chilled HBSS + glucose in the hood.
- It is recommended that you start with rat or mouse pups that are 5-7 days old. Younger animals can also be used, but the dissection will be more challenging. Animals older than 10 days rarely survive more than a few days in vitro.
- Place one pup in a closed beaker with a small piece of dry ice for anesthesia.
- When anesthetized, hold animal gently by head, rinse neck area with 70% ethanol, and decapitate with large scissors.
- Hold head right side up with the nose pointing away. Insert tip of small scissors into the foramen magnum toward the nose with the flat of the blades in the horizontal plane. Cut by moving primarily the blade on the outside of the skull. Repeat on the other side. Discard bottom of head.
- Hold top of head nose down over the petri dish. Using a spatula dipped in HBSS, push the brain stem, cerebellum, and midbrain down gently, leaving the cortex and hippocampus inside the dorsal skull. While sliding the wet spatula along the sides of the cortex, slide the cortex and hippocampus gently into the petri dish.
- Under a dissecting microscope, position the brain dorsal side down. Use one spatula in your left hand to hold the brain in place by impaling the anterior brain. Use the razor blade chip to free one hippocampus at a time (Fig. 1). First, cut the lateral end of the hippocampus and then cut posterior to the hippocampal fissure, using the prominent blood vessel as a guide. Repeat for the other hippocampus, making one cut along the midline and another between septal nuclei and the hippocampus.
- Using a spatula dipped in HBSS, gently lift and roll the hippocampus away from the cortex in the rostral to caudal direction so that it rests with area CA1 up. It is important that this be done without bending the hippocampus.
- Transfer the hippocampus to the aclar sheet on the chopper stage with CA1 up. The long axis of the hippocampus should be perpendicular to the length of the razor blade. Use a spatula to wipe any excess HBSS away from the hippocampus on the aclar. Failure to do so will result in the hippocampus being lifted by the blade while chopping. Repeat for the other hippocampus.
- Chop slices.
- Remove the aclar sheet from the chopper and, holding one corner, trim the aclar sheet into a "tongue" shape around the sliced hippocampi. Insert the aclar tongue into the small petri dish with HBSS + glucose + kynurenate and slide the slices off.
- Under a dissecting microscope, separate the slices using two sterile spatulas. It is important that this be done gently, without bending the slices.
- With proficiency, repeat steps 1-12 with a second animal.
- If desired, X-irradiate the dishes containing the slices (1500 rad over ca. 1.5 min).
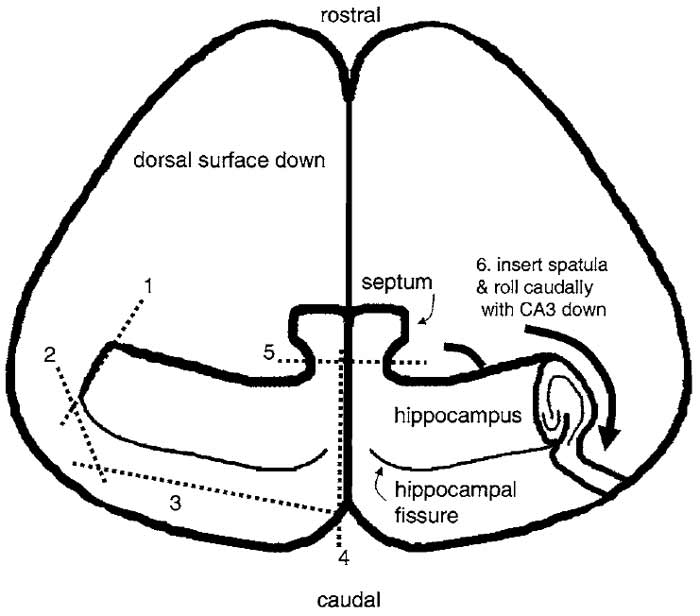 |
| FIGURE 1 Dissection of the hippocampus. The diagram shows a
view of the brain after peeling away the brain stem, midbrain, and
thalamus and removing it from the skull as described in the text. It
is pictured laying on its dorsal (i.e., cortical) surface and is viewed
from the ventral aspect. The hippocampus is dissected free by
making a series of sequential cuts with a razor blade shard as indicated
by the numbered dashed lines. After cutting, a spatula is
placed under the hippocampus and it is rolled caudally so that it
becomes free of the cortex and rests on its CA3/DG surface. |
C. Mounting Slices for Roller Drum Cultures
- Place one 20-µl drop of chicken plasma in the center of each coverslip in one 60-mm dish.
- Under the dissecting scope, choose a healthy slice and transfer to the plasma droplet with a spatula. Healthy slices have a clear, well-defined continuous cell body layer and no obvious signs of damage. Repeat for all coverslips in dish.
- Spread the plasma around and around the entire surface of the first coverslip around the slice (~3s). Add a 20-µl drop of thrombin to the coverslip and mix thoroughly with the plasma over the entire coverslip (~3s). Position the slice in the center of the coverslip and wipe excess plasma/thrombin off with a spatula. Repeat with the other coverslips and then for the second dish. After 5 min, the clot should have the consistency of a fairly liquid gelatin and should retain an indentation produced with a spatula.
- Lift coverslips from dishes and slide into tissue culture tubes so that the bottom surface of the coverslip rests on the flat surface of the tube. Cap the tube tightly and gently tap the coverslip down to the bottom of the tube, if necessary. If slices fall off coverslips, increase the concentration of the thrombin to produce a firmer clot.
- Place tubes in incubator.
D. Mounting Slices in Interface Culture Wells
The tissue dissection procedures are identical for the roller tube and membrane culture methods. Procedures for the latter preparations are different primarily in the substrate upon which the slices are placed. For membrane cultures, transfer slices with a wide-bore, fire-polished glass Pasteur pipette into the wells. To facilitate removal of slices from wells, small membrane pieces (e.g., Whatman Nucleopore membranes # 112107) can be cut and placed at the bottom of the insert before plating the slices.
E. Antimitotics
1. Add antimitotics after the first 4 or 5 days in culture.
2. Add 20µl to each tube.
3. Exchange culture medium after 24 h.
F. Feeding the Cultures
1. Feed the cultures once per week.
2. Pour off medium into a beaker in the hood. About 250 µl will remain in tube.
3. Replace with 500µl fresh medium.
G. Assessing the Health of the Cultures
- Cultures should remain adhered firmly to the plasma and coverslip. If they fall off despite a firm clot at the time of culturing, suspect either insufficiently cleaned coverslips or a problem with the poly-L-lysine.
- After 24-48 h in vitro, the slices will appear more opaque as the macrophages and other cells proliferate; remove damaged tissue. The cell body layer should remain relatively clear and visible. Glial cells migrating out of the edges of the slice should be apparent.
- After 14 days in vitro, most of the macrophages should have disappeared and the cell body layer should be continuous and more transparent than the dendritic layers. Our studies indicate that the cultures are not completely mature before this time.
- In our experience, unhealthy cultures can usually be attributed to mishandling of the tissue during dissection and mounting. If you have had good cultures previously and an entire batch goes bad, suspect a bad ingredient common to all of the cultures. If some cultures are good and some are bad, suspect a problem of dissection (it is helpful to note which slices came from which pups).
References
Debanne, D., Gähwiler, B. H., and Thompson, S. M. (1994). Asynchronous pre- and postsynaptic activity induces associative longterm depression in area CA1 of the rat hippocampus in vitro. Proc. Natl. Acad. Sci. USA 91, 1148-1152.
Debanne, D., Guerineau, N. C., Gähwiler, B. H., and Thompson, S. M. (1995). Physiology and pharmacology of unitary synaptic connections between pairs of cells in areas CA3 and CA1 of rat hippocampal slice cultures. J. Neurophysiol. 3, 1282-1294.
Gähwiler, B. H. (1981). Organotypic monolayer cultures of nervous tissue. J. Neurosci. Methods. 4, 329-342.
Gähwiler, B. H. (1984). Development of the hippocampus in vitro: Cell types, synapses, and receptors. Neuroscience 11, 751-760.
Gähwiler, B. H., Capogna, M., Debanne, D., McKinney, R. A., and Thompson, S. M. (1997). Organotypic slice cultures: A technique has come of age. Trends Neurosci. 20, 471-477.
Gähwiler, B. H., Enz, A., and Hefti, E (1987). Nerve growth factor promotes development of the rat septo-hippocampal cholinergic projection in vitro. Neurosci. Lett. 75, 6-10.
Gähwiler, B. H., Thompson, S. M., McKinney, R. A., Debanne, D., and Robertson, R. T. (1998). Organotypic slice cultures of neural tissue. In "Culturing Nerve Cells" (G. Banker and K. Goslin, eds.), 2nd Ed., pp. 461-498. MIT Press, Cambridge, MA.
Stoppini, L., Buchs, P.-A., and Muller, D. (1991). A simple method for organotypic cultures of nervous tissue. J. Neurosci. Methods 37, 173-182.
Zimmer, J., and G/ihwiler, B. H. (1984). Cellular and connective organization of slice cultures of the rat hippocampus and fascia dentate. J. Comp. Neurol. 228, 432-446.
Support our developers


