Preparation of Monoclonal Antibodies
I. INTRODUCTIONIn 1975 Kohler and Milstein reported the outcome of fusing antibody-producing mouse spleen cells with a mouse myeloma cell line. The monoclonal antibodies produced were of the specificity dictated by the spleen cells but in the quantity characterized by the myeloma cell line. From this beginning the preparation of monoclonal antibodies has become an important tool in almost every scientific discipline. No longer restricted to the immunology laboratory, monoclonal antibodies are used in a variety of experimental techniques and diagnostic assays and now, with improvements in molecular engineering techniques, are realizing their potential in therapeutic applications (Grillo-Lopez, 2000).
When the need arises to produce monoclonal antibodies to a particular antigen, the decision to establish the technology, use commercial enterprises, or approach private groups to produce them has to be made.
For laboratories that decide to establish the technology, this article describes a method that has evolved in our laboratory since the mid-1980s. The method is robust, in routine use, and has produced hundreds of monoclonal antibodies to a wide variety of antigens. The method uses commercial high-quality reagents, including cloning supplements that replace the messy and wasteful use of in vivo-derived feeder cells. The reagents detailed are the ones used in our laboratory but other manufacturers make equivalent reagents.
The intention of this article is to describe the reagents, equipment, and techniques used to prepare monoclonal antibodies. Full reviews of monoclonal antibody production, including methods for characterization, purification, use of monoclonal antibodies, and antibody engineering applications, are available in a number of monographs, including Campbell (1991), Donohoe et al. (1994) and Goding (1986).
Sterile culture technique and accurate record keeping are essential for success in monoclonal antibody preparation. The sterile culture technique is not difficult to learn, with attention to detail paramount for success. There are many excellent texts on basic and advanced tissue culture techniques, including Freshney (2002) and Harrison and Rae (2003).
II. MATERIALS AND INSTRUMENTATION
A. Essential Equipment
Sterile laminar flow hood, benchtop centrifuge, liquid nitrogen storage or equivalent, 37°C water bath, and a 37°C, 5% CO2 gassed tissue culture incubator. An inverted microscope to view cell growth is also useful.
B. Cell Culture Reagents
RPMI 1640 (10 × 500ml) (Cat. No. 21870-092), penicillin (10,000 U) / streptomycin (10,000 µg), L-glutamine (29.2 mg) (PSG×l00, Cat. No. 10378-016), 10 mM sodium hypoxanthine, 40µM aminopterin, 1.6mM thymidine (HAT×l00, Cat. No. 31062-011), 10mM sodium hypoxanthine, and 1.6mM thymidine (HT×l00, Cat. No. 11067-030) are from GIBCO Invitrogen Corporation. Fetal bovine serum (FBS, Cat. No. 12003-500M) is from JRH Biosciences; select batches of FBS that have been screened for hybridoma production. Complete Freund's adjuvant (CFA, Cat. No. 77140) and incomplete Freund's adjuvant (IFA, Cat. No. 77145) are from Pierce Biotechnology Inc. Hybridoma fusion cloning supplement (HFCS, Cat. No. 592247800) and polyethylene glycol 1500 in 75 mM HEPES, sterile and fusion tested (PEG, Cat. No. 783641), are from Roche Diagnostics. Red blood cell lysing buffer (8.3g/liter NH4Cl in 0.01M Tris-HCl) (Cat. No. R-7757) and trypan blue solution (Cat. No. T- 8154) are from Sigma. Dimethyl sulfoxide (DMSO, Cat. No. 102950) is from Merck. ELISA-based isotyping kits are available from a number of manufacturers, including Roche Diagnostics (Cat. No. 1183117) and Pierce Biotechnology Inc (Cat. No. 37502). Store all stock reagents as recommended by the manufacturer.
C. Cell Culture Materials
Tissue culture plates, 24-well (Cat. No. 143982) and 96-well (Cat. No. 167008) flat-bottom plates with lids, 25-cm2 (Cat. No. 136196) and 80-cm2 (Cat. No. 178891) tissue culture flasks, cryotubes (Cat. No. 375418), 10-ml disposable pipettes (Cat. No. 159633) and petri dishes (Cat. No. 150350) are from Nalge Nunc Int. V-bottom 30-ml tubes (Cat. No. 128A) and wide-bore graduated transfer pipettes (Cat. No. PP88SA) are from Bibby-Sterilin Ltd.
A container (Cat. No. 5100 Nalgene Nunc) or a foam box with walls of about 1 cm thick is required for the control rate freezing of cells.
In addition, we use Gilson Pipetman 5- to 20- and 20- to 200-µl pipettes and a Gilson Distriman repeating pipette for cloning, all with sterile tips. Hamilton 500-µl glass luer lock syringes are used for immunization (Cat. No. 1750 Hamilton, Reno. Nev). Sterile forceps and scissors are also required.
D. Myeloma Cell Line
Several myeloma cell lines are commonly used for fusion with murine spleen cells; most have been derived from the P3X63Ag8.653 murine myeloma line (Kearney et al., 1979). The myeloma clones SP2/0 (Shulman et al., 1978) and FO (de St Groth and Scheidegger, 1980), derived from P3X63Ag8.65, are commonly used. These cell lines are available from the American Type Culture Collection (ATCC) (http://www.atcc.org) as CRL1580, CRL1581, and CRL1646, respectively. We use P3X63Ag8.653 cells that have been maintained in our laboratory for many years, which are screened regularly for mycoplasma, and we select batches that have been previously successful in hybridoma production.
III. PROCEDURES
A. General
The preparation of monoclonal antibodies depends on a series of steps that require attention to detail and careful laboratory management. The major requirement is time; Table I gives an approximate time frame for monoclonal antibody preparation. Phase I is largely taken up by the immunization protocol, ensuring that the screening method is working, growing the myeloma cells, and finally performing the fusion. Phase 2 encompasses testing, cloning, and freezing and is more labor-intensive. However, the workload is variable and unless the screening method is cumbersome or many fusions are carried out, it is not a fulltime occupation.
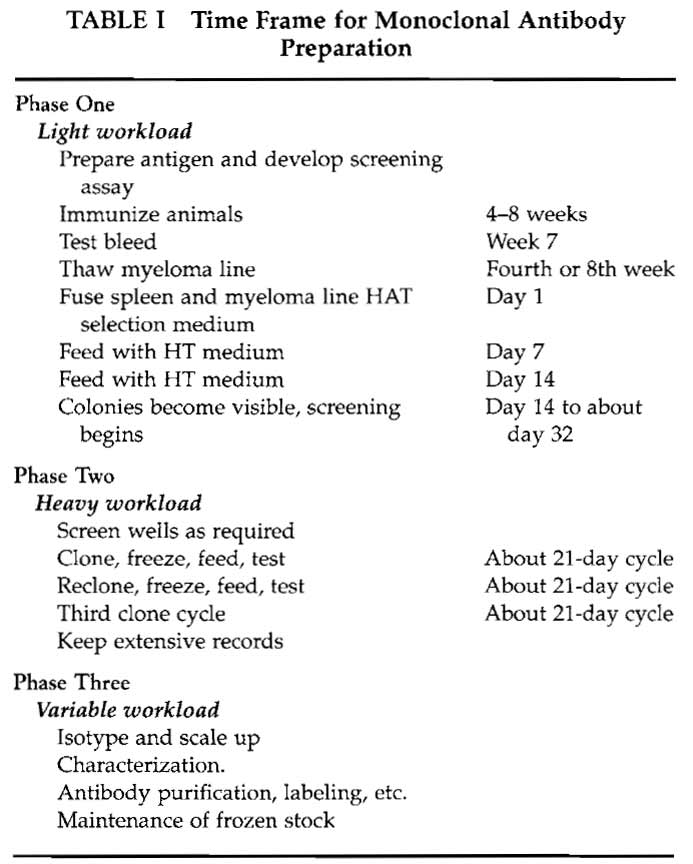 |
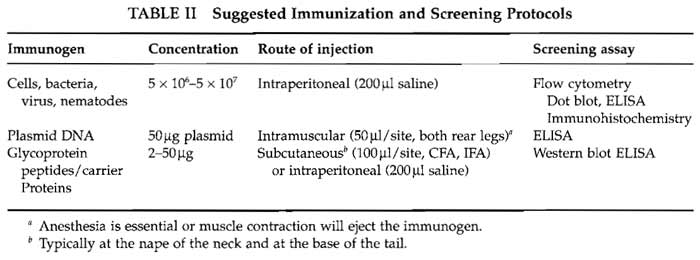
In our experience the secret to success in monoclonal antibody preparation is the screening method. Ideally the method should be in place before the animals are immunized. The method needs to be robust and reliable and, as there may be 30 to 50 samples to screen a day, reagents and equipment need to be readily available. The method should be appropriate to the intended use of the monoclonal antibodies. Although many antibodies do perform in alternative protocols, there is no guarantee unless they have been screened appropriately. Some suggestions for screening methods are included in Table II, but detailed descriptions are outside the scope of this article.
 |
B. Antigen Preparation and Immunization
A number of protocols that we have used to immunize mice to a variety of antigens are shown in Table II. Animals can make antibodies to a wide range of molecular structures with two important general exceptions: animals will not usually make antibodies to self-antigen (see Section V) and will not usually recognize small molecules. Small molecules need to be conjugated to a carrier protein. Selection of the carrier protein appears to be largely personal, but the ease of and position of conjugation are important criteria. When linking peptides to carrier proteins, Landsteiner's principle (Landsteiner, 1945) should be taken into account, that antibody specificity tends to be directed to epitopes of the hapten furthest removed from the functional group linked to the carrier protein.
Commonly used carrier proteins include keyhole limpet hemocyanin (KLH) and bovine serum albumin (BSA). If you are going to screen for monoclonal antibodies by ELISA, make both peptide-KLH and peptide-BSA combinations; immunize with one and screen against the other. There are a number of methods for the conjugation of peptides to carrier proteins and the protocol selected will depend on the amino acid sequence of the peptide and the epitope of interest. However, if you are having a peptide synthesized, consider adding a biotin tag; a streptavidinconjugated carrier protein can then make a convenient carrier.
If high-affinity IgG monoclonal antibodies are required, the immunization protocol needs to invoke T-cell help. Hence, adjuvant and several booster injections may be needed and test bleeds should be examined for the presence of antigen-specific IgG. If IgG isotype monoclonal antibodies are essential, they should be screened for specifically.
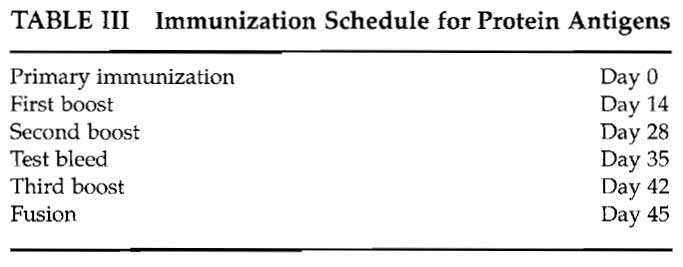
The protein antigen immunization schedule used in our laboratory is shown in Table III. Most protocols require antigen in adjuvant for immunization. Complete Freund's adjuvant (CFA) is highly effective but may cause toxic side effects. A number of new adjuvants are becoming available, including Hunter's TiterMax (http://www. titermax, com), Pierce' s AdjuPrime Immune Modulator (http://www. piercenet.com), and RIBI adjuvant systems (http://www.corixa.com) among others. Advice from the Institutional Animal Ethics Committee should be taken on which adjuvants are recommended.
 |
If CFA is used, it should only ever be used subcutaneously for the primary immunization and Freund's incomplete used for subsequent boosts.
Complete Freund's adjuvant causes inflammation and granuloma formation in mice and will cause severe injury in humans. Take suitable precautions to prevent self-injection and employ eye protection.
Six-week-old female BALB/c mice are preferred for immunization as the myeloma lines used for fusion were derived from that strain. Routinely, we immunize six animals, in batches of two, with a 2-week interval between immunizing the next two animals.
Steps
Wear eye protection.
- Draw an equal volume of antigen in saline and CFA into two separate Hamilton 500-µl glass luer lock syringes.
- Connect the syringes with a three-way stopcock and emulsify the mixture slowly by passing material from one syringe to the other.
- Check that an emulsion has been formed by taking a drop of the mixture from the stopcock and placing on water, an emulsion will float and not dissipate.
- Using the Hamilton syringe and a 21-gauge needle, immunize the animals with 100µl of emulsion subcutaneously at the base of the tail and nape of the neck.
C. Test Bleeds
Analysis of a test bleed can allow the fusion to be postponed and the animals reimmunized if the antibody titer is low or nonexistent. Test bleeds should only be carried out by experienced personnel. Test bleeds should preferably be from the lateral tail vein using a 26-gauge needle and syringe. A maximum of 1% of the body weight of the animal should be collected, about 100-200 µl. Larger volumes of blood can be collected at the time of euthanasia and can provide a valuable positive control sample for the screening protocol.
D. Myeloma Cell Preparation
About 1 week before the fusion, thaw a vial of the myeloma cell line from the liquid nitrogen stock (see Section IV, B).
The myeloma cells should be of known pedigree; it is vital to maintain the myeloma line carefully. Mycoplasma-contaminated stock or stock that has been overgrown will result in poor production of hybridomas.
Steps
- Transfer the cells into 24-well plates at about 2× 10⁵ per well, check cell numbers daily, and scale up as they double in number into 25-cm2 flasks and then into 80-cm2 flasks containing 50ml of RF10.
- Maintain vigorous growth rates during the scaleup period. The day prior to the fusion the myeloma cells should be given a one-to-one split so that the cells are in an exponential growth phase at the time of fusion.
- The number of myeloma cells required depends on how many spleen cells are to be fused. Typically, we use a spleen to myeloma cell fusion ratio of 10:1. Normal BALB/c mice produce about 108 leukocytes per spleen, hence 107 myeloma cells are required for each spleen.
- On the day of the fusion and before the animals are euthanized, examine the myeloma cells carefully to check that the culture is not contaminated.
IV. CELL FUSION PROCEDURE
Solutions
- RFIO medium: To 500 ml of RPMI 1640 add 50 ml of FBS and 5ml of PSG×l00. Store at 4°C for up to 14 days; after 14 days replace the PSG. Warm to 37°C in a water bath before use.
- HAT selection medium: Reconstitute 100× lyophilized HAT supplement with 10ml of sterile distilled water and store 1-ml aliquots at 4°C protected from light. Add 1 ml HAT and 2ml of HFCS to 100ml of RF10 medium. Make only as much as required for the fusion. Warm to 37°C in a water bath before use.
- HT medium: To 500ml of RF10 medium add 5 ml of HT supplement. Warm to 37°C in a water bath before use.
- HT medium +2% HFCS: Add 2ml of HFCS to 100 ml HT medium. Warm to 37°C in a water bath before use.
A. Background Notes
HAT medium is used to selectively grow hybrids following fusion. Aminopterin selects against unfused myeloma cells and myeloma:myeloma-fused cells by blocking the main synthetic pathway for DNA. Unfused spleen cells do not have the capacity to survive for more than a few days. In hybridomas, hypoxanthine and thymidine supply purines and pyrimidines for DNA synthesis via HGPRTase salvage pathways derived from the spleen cells. The HT medium acts as a rescue medium while the aminopterin is being diluted out. Although the HT medium can be withdrawn once the nucleoside biosynthesis pathways are re-established, in our experience it is rarely worth the effort.
Cells under pressure often require "supplements" to maintain growth. In many monoclonal antibody preparation methods, these are supplied by feeder cells, usually mouse thymocytes or peritoneal washout cells. In the method described, feeder cells are replaced with hybridoma fusion cloning supplement HFCS, which in addition to being preferred for reasons of animal ethics, is more convenient and, in our experience, more effective.
B. Fusion Protocol
Steps
- For each spleen to be fused, place a 1-ml aliquot of PEG mixture and a 3- and a 7-ml aliquot of RF10 in a 37°C water bath.
- After euthanasia, submerge the mouse in 70% alcohol for a few minutes; this prevents hair and bedding material from contaminating the laminar flow hood.
- Place the animal on its right-hand side, grasp the skin posterior to the rib cage with sterile forceps, and make a small incision to cut the skin but not to penetrate the subcutaneous fascia. With two pairs of forceps, grasp the skin at either side of the incision and pull. The skin should peel away, revealing the subcutaneous fascia. Flush the area with 70% alcohol to remove any stray hair. Using forceps and scissors, cut through the subcutaneous fascia into the peritoneal cavity and locate the spleen and remove by cutting away the connective tissue.
- Place the spleen into a petri dish containing about 15ml of RF10. At this point, blood can be collected by opening the thoracic cavity, quickly puncturing the heart, and collecting blood; this can be useful as a positive control.
- Half-fill two 10-ml syringes with RF10 from the petri dish and, using 21-gauge needles, gently disrupt the spleen by injecting the medium. Inject the media slowly, a little at a time; you should see clouds of cells going into the medium and the spleen turning lighter in color. Finally, when the spleen looks like a limp sack, gently tease apart the spleen with the needle and flat tweezers to remove any remaining cells. Discard the spleen connective tissue.
- Gently pipette the cell suspension to break up clumps and transfer into a 30-ml V-bottom tube, ignoring large clumps and the remains of the spleen connective tissue; let the tube stand for about 5 min.
- Remove cells from the tube and transfer into another 30-ml V-bottom tube, leaving behind the debris and connective tissue that has settled to the bottom.
- Pellet the spleen cells at 400g for 5 min.
- Resuspend the cell pellet in 5ml of red cell lysing solution, leave for 5 min, and then fill the tube with media and pellet at 400g for 5 min.
- Resuspend the spleen cells in 5 ml of media and perform a cell count. The number of leucocytes derived from a single spleen should be approximately 108 cells total.
- Wash and count the myeloma cells; for 108 spleen cells, 107 myeloma cells will be required.
- Add the myeloma cells to the spleen cell suspension to give a spleen/myeloma cell ratio of 10:1. Note: This is the critical bit, for the next 20min you will be committed to fusing the cells.
- Pellet the cells (400g for 5 min) and remove all of the supernatant; this is best done with a Pasteur pipette attached to a vacuum line.
- Tap the pellet to loosen the cells.
- With a wide-bore transfer pipette, add 1 ml of PEG solution per spleen. Gently mix with the pipette for 10s and then continue to mix the cells gently by tapping the tube for a further 50 s.
- Retrieve the 3-ml RF10 sample and slowly add dropwise over a 10-min period continually mixing the cells gently by tapping the tube. This can be accomplished (for a right-handed person) by holding the tube in the left hand between thumb and forefinger, tapping the tube with the second or third finger, depending on comfort and reach, and adding the medium with a transfer pipette held in the right hand. With a little practice a steady rhythm can be produced.
- After the first 3 ml, retrieve the 7-ml aliquot and add over the next 10-min period.
- Pellet the cells at 400g for 5 min and resuspend in about 10 ml of RF10; loosen the tube cap to allow for CO2 transfer and place the cells in the tissue culture incubator for about 1 h.
- Pellet the cells at 400g for 5 min.
- Gently resuspend the cell pellet in a small volume of the HAT selection medium.
- Add this suspension back into HAT selection medium; 50ml of HAT selection medium will be needed for every 107 myeloma cells used in the fusion.
- Add about 1 ml of the cell suspension to each well of the 24-well plates. This is the equivalent of 2 × 10⁵ myeloma cells per well. We prefer plating the fusion into 24-well plates, as evaporation is less of a problem. The larger volume also provides enough supernatant for any screening assay.
- Label and place the plates in the tissue culture incubator.
With the exception of the 1-h incubation period, the entire fusion protocol should take no more then 2 to 3h.
C. Maintaining Hybridomas
Examine the wells using the inverted microscope on days following the fusion. Do not keep the plates out of the incubator for more than about 10min, as media in the wells will cool and the pH may also change. Large numbers of dead cells may be seen, this is normal. You may also see some small moving particles; this is due to Brownian movement of debris and does not indicate bacterial infection.
After 7 days, media needs to be replenished, this is also the beginning of diluting out the aminopterin from the HAT selection medium. To each well add 1 ml of HT medium +2% HFCS. Add the medium slowly so as not to break up any colonies; this is not critical, but it is easier to judge when to test a well if you can see the size of intact colonies.
From now on it is a matter of observing colony growth and changes in the pH of the medium. Screen for antibody from wells in which the medium is yellow (acidic) and colonies are about 25% confluent. Keep feeding wells on a 7-day cycle for slow growers and as needed for fast growers. For the second and subsequent feeds we use HT medium +1% HFCS.
D. Testing and Cloning
When testing for antibody, ensure that appropriate negative controls are used. A positive control can be a dilution of the test bleed or of serum collected when the spleen was removed. If screening by ELISA, falsepositive "antiplastic responses" can be a nuisance. The use of antigen-negative wells as a control can help screen these out. It is a waste of time cloning cells from wells that display an antiplastic response.
Cells from wells that are positive in the screening assay need to be cloned and stored in liquid nitrogen as soon as possible. Cloning is performed not only to produce a monoclonal population, but also to stabilize cell growth and eliminate antibody nonproducers. Nonproducers often grow faster than cells producing antibody and can quickly outgrow the antibodyproducing population.
We routinely clone at 3 cells per well and observe about two-thirds of the wells with cell growth. This approximates to Poisson's distribution of a probable cell cloning number of 1 cell per well. If you find more wells with cell growth, clone at a lower cell number per well, 1 or even 0.5 cells per well.
E. Cloning
Solutions
- HT medium +2% HFCS: Add 2ml of HFCS to 100 ml of HT medium. Store at 4°C. Warm to 37°C in a water bath before use.
- Trypan blue solution (Cat. No. T8154 Sigma)
Steps
- Gently resuspend the cells in a positive well of the 24-well plate using a sterile transfer pipette; avoid creating air bubbles. Transfer the cells to a new 24-well plate.
- Perform a viable cell count at a 1:2 dilution in trypan blue solution. In this example we will work from a viable cell count of 6 × 10⁵ cells / ml
- To obtain 3 cells/well, perform a series of dilutions: 1/1000 dilution = 600 cells/ml; add 10µl cells into 10 ml of HT medium. From this make a 1/20 dilution = 30 cells/ml or 3 cells/100µl.
- Conveniently make this dilution by taking 500 µl of cells from the 1/1000 dilution and place into 9.5 ml of HT medium +2% HFCS. This gives 10ml of cells, which is sufficient for one cloning plate at 100µl per well.
- Using a Gilson Distriman, add 100µl of cell suspension to each well of a flat-bottomed 96-well plate. Label the new plate with the date and code of the original well and plate that it came from, e.g., P1D3 means plate 1 row D well 3.
- Examine the cloning plates regularly and replenish with HT medium +2% HFCS on at least day 7 but beforehand if noticeable evaporation of media occurs. Some methods suggest wrapping 96-well plates with plastic film to slow down evaporation. This can be successful but makes viewing the wells difficult and can also give a false sense of security, care also needs to be taken when removing the film so as not to contaminate the plate.
- Test wells that display cell growth as required, reclone, and freeze cells from positive wells using the same procedure. We clone a minimum of three times in order to achieve monoclonality.
When storing positive wells in liquid nitrogen, we routinely store two vials from the initial positive 24- well plate. From subsequent 96-well cloning plates we keep no more than three or four positive wells and store about two cryotubes of each and the same at each subsequent cloning step.
F. lsotyping and Scaling up of Hybridomas
Isotyping of the monoclonal antibody can be performed with a commercial ELISA kit, this can help confirm monoclonality and determine the strategy for antibody purification from the culture supernatant.
Care should be taken in scaling up the cultures from wells to flasks, ensure that cell growth is stable, and split cells into a number of wells of the 24-well plate; we establish confluent growth in at least four wells before transferring the cells to a 25-cm2 flask.
V. LIQUID NITROGEN STORAGE PROCEDURE
The only means by which long-term survival of hybridomas can be achieved is by storing cells in liquid nitrogen. It is essential that an up-to-date catalogue of stocks is maintained. Valuable hybridoma stocks should be kept in more than one freezer, preferably at separate sites.
A. Cell Freezing Protocol
Solutions
- Solution A: Gently mix 10 ml of RF10 and 10 ml FBS. This solution may be stored at 4°C indefinitely if kept sterile. Warm to 37°C in a water bath before use.
- Solution B: Add 6ml of DMSO to 14ml of RF10. This mixture causes an exothermic reaction and may be stored at 4°C for several days if kept sterile. Warm to 37°C in a water bath before use.
Steps
- Resuspend cells in solution A.
- To this add an equal volume of solution B. Mix the suspension gently and dispense into labeled sterile cryotubes.
- After sealing the tubes, place them into a Nunc freezing container or a foam box.
- Put the container into a -80°C freezer for 24 h, after which the tubes should be transferred into a liquid nitrogen store. The location and contents of the tubes have to be catalogued carefully.
B. Cell Thawing Protocol
We strongly recommend that full-face protection be worn when retrieving cells from liquid nitrogen.
- Remove vials using cryogloves and forceps.
- Transfer vials immediately to a shatter-proof container.
- Using a beaker, transfer warm water from the 37°C water bath into the container.
- The lid of the container need only be partially removed to allow access with the beaker and replaced as soon as water is added. The use of the shatter-proof container prevents injury from tubes that explode on contact with warm water. This is a comparatively rare event but has caused severe injury.
- After a few minutes when the contents have thawed, remove and wash the vials in alcohol.
- Remove the cells with a transfer pipette and place in a sterile 30-ml tube.
- Slowly add an equal volume of RF10 medium dropwise.
- Let stand for 5 min.
- Add 10ml of RF10 and let stand for a further 5 min.
- Centrifuge at 400g for 5min and resuspend in HT medium for hybridomas and in RF10 for myeloma.
- We routinely start cells growing at about 2 × 10⁵ cells/well in a 24-well plate. The addition of 1% HFCS will speed up cell growth. Do not let cells overgrow and scale up to other wells and flasks as required.
- The first priority is to maintain frozen stock, so ensure that more tubes are stored in liquid nitrogen.
V. COMMENTS
We have overcome tolerance to self-antigen by linking the conserved peptide to a fusion protein and using the construct as the immunogen. Using this strategy, we have been successful in making antibodies to a human peptide with 95% homology to the murine protein (Cavill et al., 1999).
If purchasing a tissue culture incubator, ensure that it can be cleaned easily, has readily accessible filters that are changed easily, and does not have "hidden" tubing that cannot be cleaned and acts as a harbor for infections.
VI. PITFALLS
- Make sure that the marker pen ink used to label the cryotubes tubes is resistant to alcohol.
- We cannot overemphasize the importance of storing positive hybridomas in liquid nitrogen for subsequent retrieval.
References
Campbell, A. M. (1991). Monoclonal antibody and immunosensor technology. In "Laboratory Techniques in Biochemistry and Molecular Biology" (van der Vliet, P. C., ed.) Elsevier, Amsterdam.
Cavill, D., Macardle, P. J., Beroukas, D., Kinoshita, G., Stahl, J., McCluskey, J., and Gordon, T. P. (1999). Generation of a monoclonal antibody against human calreticulin by immunization with a recombinant calreticulin fusion protein: Application in paraffin-embedded sections. App. Immunohistochem. Mol. Morphol. 7, 150-155.
de St Groth, S. E, and Scheidegger, D. (1980). Production of monoclonal antibodies: Strategy and tactics. J. Immunol. Methods 35, 1-21.
Donohoe, P. J., Macardle, P. J., and Zola, H. (1994). Making and using conventional mouse monoclonal antibodies. In "Monoclonal Antibodies: The Second Generation" (H. Zola, ed.), Biological Sciences, Coronet Books, Philadelphia, PA.
Freshney, R. I. (2002). "Culture of Animal Cells: A Manual of Basic Technique," 4th Ed. Wiley-Liss, New York.
Goding, J. W. (1986). "Monoclonal Antibodies: Principles and Practice," 2nd Ed. Academic Press, London.
Grillo-Lopez, A. J. (2000). Rituximab: An insider's historical perspective. Semin. Oncol. 27(Suppl. 12), 9-16.
Harrison, M. A., and Rae, I. E (2003). General Techniques of Cell Culture. In Handbooks in Practical Animal Cell Biology (M. Harrison, I. E. Roe, A. Harris, Series Eds.) Cambridge Univ. Press, Cambridge, U.K.
Kearney, J., Radbruch, A., Liesegang, B., and Rajewsky, K. (1979). A new mouse myeloma cell line that has lost immunoglobulin expression but permits the construction of antibody-secreting cell lines. J. Immunol. 123, 1548-1550.
Kohler, G., and Milstein, C. (1975). Continuous cultures of fused cells secreting antibody of predefined specificity. Nature 256, 495-497.
Landsteiner, K. (1945). "The Specificity of Serological Reactions." Harvard Univ. Press, Boston, MA.
Shulman, M., Wilde, C. D., and Kohler, G. (1978). A better cell line for making hybridomas secreting specific antibodies. Nature 276, 269-270.
Support our developers


