The Bright Field Microscope
Materials- Binocular microscope
- Microscope slide
- Pick up a microscope from the cabinet by placing one hand under the base and the other on the arm of the microscope. Most microscope damage is due to careless transport.
- Place the microscope in front of you, unwind the power cord, and plug it
in. The microscope is normally provided in its storage position; that is,
with its eyepieces pointed back over the arm. This takes up less room in
a cabinet, but is not the position for which it was designed to be used. If
your instructor approves, slightly loosen the screw holding the binocular
head and rotate the entire binocular head 180°. Carefully (and gently)
tighten the screw to prevent the head from falling off.
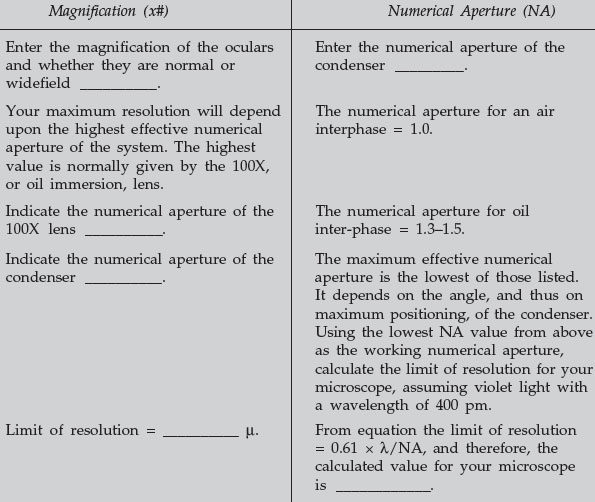
You will notice that all parts of the microscope are now conveniently located for your use, with an uninterrupted view of the stage and substage. The focus controls are conveniently at arms length. Note the magnification power and the numerical aperture of the lenses that are on your microscope’s nosepiece. These values are stamped or painted onto the barrels of the objectives. Record the magnification power and numerical aperture of each lens in the space provided:
- Obtain a prepared microscope slide. Place the slide on the stage and ensure that it is locked in place with the slide holder. Rotate the condenser focusing knob to move the condenser to its highest position. Although there is an ideal location for the condenser, the correct position of the condenser will vary slightly for each objective. Unless directed otherwise, it will not be necessary to move the condenser during any of the tended uses in this course. If, however, you wish to find the ideal location, focus the microscope on any portion of a slide, and then simply close down the condenser aperture and move the condenser until you have a sharply focused view of the condenser aperture (usually with a slight blue hazy edge). If you do this, you can then open the aperture until it just fills the field of view (different for each objective). This is the correct location, and use of the condenser and aperture and the condenser should not be moved from this position. Never use the condenser aperture for control of light intensity. Control of light intensity is the purpose of the variable rheostat (dimmer switch, or voltage regulator) on the light source.
- Turn on the microscope by rotating the dimmer switch and adjust the light intensity to a comfortable level. Be sure that the condenser aperture is open if you have not set it as directed in the previous paragraph (slide the on denser diaphragm lever back and forth to check).
- Looking down into the microscope, adjust the eyepieces to your interpupillary distance and diopter. The Nikon microscope is equipped with a knob between the eye tube extensions for this adjustment. Many microscopes simply require pushing the eye tubes together or apart directly. Move the eye tubes back or forth until you see one uniform field of view.
The first time you use the microscope, adjust the eyepieces for your personal comfort. Note that modern microscopes have HK (high eye point) eyepieces and, consequently, you need not remove eyeglasses if you are wearing them. Quite the contrary, they should be worn to prevent eyestrain while you constantly shift from looking through the microscope to reading the lab manual.
- Begin by focusing the microscope on any object within the field of view.
- Find a suitably contrasting location in the center of the field of view and close your left eye. Using the coarse and fine adjustments, focus until you obtain a sharp image with your right eye only.
- Now close your right eye and adjust the focus of the left eyepiece by rotating the diopter-adjusting ring located on the left eyepiece. Do not readjust the focus of the left eye with the coarse or fine adjustments of the microscope-use the adjustment ring on the eye tube.
All subsequent uses of the same microscope will involve use of the coarse and fine focus adjustments, without reference to the procedures in step 2. That is, step 2 need only be performed once at the beginning of your lab. It may, of course, be checked periodically if desired, and will need to be readjusted if someone else uses your microscope.
Optional
Familiarize yourself with the operation of any tension adjustment options or preset devices that may be attached to the microscope.
Coarse adjustment tension: The coarse adjustment may be eased or tightened by the adjusting ring. If the rotation of the coarse focus knob is too loose, turn the adjusting ring counterclockwise. Too much tension may be adjusted by turning clockwise. Avoid excessive rotation, as it will place undo stress on the internal gears. Adjust the tension so that the stage will remain stationary after focusing, but can be moved with relative ease by turning the coarse adjustment knob. Some microscopes require turning the 2 coarse adjustment knobs in opposite directions, while others require the use of a screwdriver. Be sure to check with your instructor or the manufacturer’s directions before adjusting this feature.
Support our developers


