Preparation of Beds
The normal rectangular vegetable plot being broken up into a series of narrow beds, set between access paths. As we have already noted, digging may be needed to break up soil compaction. A key consideration in adopting the bed system is that it enables you to avoid this and to maintain a good soil structure. The beds can be anywhere from 3 to 5 ft (90 to 150 cm) wide, to suit the individual. The guiding principle is a width that enables you to reach all parts of the bed comfortably when sowing, tending or harvesting the crops. Most people find a width of 31/2 to 4 ft (105 to 120 cm) is adequate for their reach. The paths between can be narrow, to avoid undue waste of productive ground, but preferably of sufficient width to accommodate a wheelbarrow: 18 in (45 cm) is normally sufficient.Size of the Beds
The beds can be any length, but it is convenient to break them up with crosspaths to facilitate access - and to avoid the temptation to walk across them. In this way, each bed will be accessible from a path on all four sides. This also provides a cordon sanitaire between the beds and any encroaching vegetation. They are best aligned north to south so that tall crops do not shade out lower, adjacent plants. Beds tend to be straight, but there is no reason why they should not be curved for aesthetic or other reasons.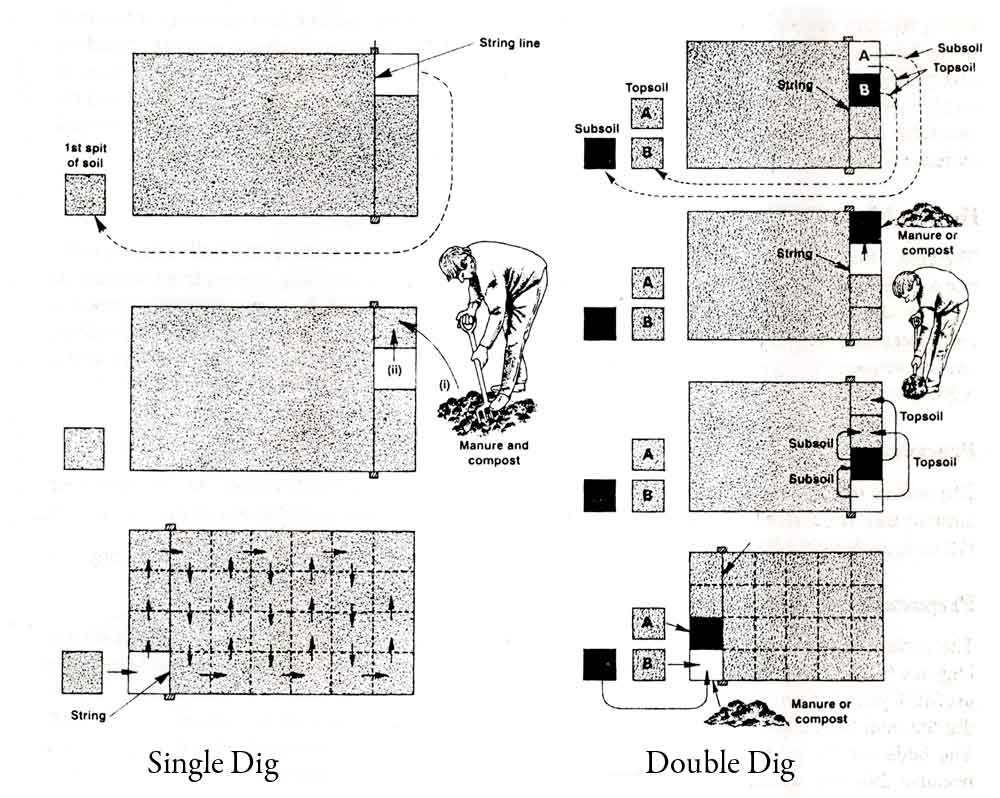
Why Raised Beds?
There are two reasons for the higher yields on the bed system - raised beds in particular. First, the ability to carry out weedling from the adjacent paths makes wide spacing between rows redundant. It has been established that optimum yields can, in fact, be obtained if closer spacing, based on grid patterns are employed. Secondly, the raised bed is usually associated with a higher level of fertility as a result of the application of regular and substantial amounts of organic material and the excellent soil structure and soil life that is maintained. It should be noted, too, that the overall increase in yield will more than compensate for the loss of ground given over to the paths.
How to Make Bed?
The best time to do this is when the soil is neither soggy - especially important with a heavy soil -nor too dry. At this point, you have the option whether to go for a no-dig system from scratch, or first to dig and incorporate manure or compost. Some raised bed practitioner's strike a compromise, starting the bed off with a double digs and lavish incorporation of organic matter, and subsequently relying on a no-dig annual mulch. Others choose to dig every four or five years, relying on mulches in between.
Procedure
The soil in the bed may first be loosened with a fork, as a one-off cultivation. At the same time remove any large stone. Remember, the aim is to clear the topsoil only. Ignore stones below 6 in (15 cm), as these assist drainage. The same applies to old roots.

Finally, spread your organic matter over the bed. With the bed system this will go further, since it is being confined to the intensively cultivated bed surfaces alone, not spread over the whole vegetable plot. In time the beds will slump a little, but you will never 'lose' them, and they will, of course, be raised annually by the application of organic mulch.
The paths need to be covered to prevent weeds settling in and spreading to the beds. They can be turfed over, which will certainly look attractive, but they will require mowing. Besides, the sward may compete with the plants. Wood chips make an attractive covering and are, on balance, more suitable. They can be laid on old carpeting or other material, to extend their life. If soil is a truly sticky, yellow viscous clay with little dark topsoil, you may find it exceedingly difficult to create paths as described or to create a tilth on the bed. In that case the only alternative-is to import large quantities of compost or even topsoil to make the beds, in effect making your existing topsoil.
Support our developers


