Isolation of Cajal Bodies
I. INTRODUCTIONThe Cajal body (CB) is a subnuclear organelle involved in the biogenesis of snRNPs and snoRNPs. It was first described by Ramon-y-Cajal as the "nucleolar- accessory body" in silver nitrate-stained neuronal cells (Cajal, 1903). Later, electron microscopy studies on neuronal cells showed that this nuclear domain sometimes resembled a ball of coiled threads 0.15 to 1.5 gm in diameter. The identification of CBs in the fluorescence microscope was facilitated by the discovery of p80 coilin, a human autoantigen that is enriched in the CB (Andrade et al., 1991). Antibodies against human p80 coilin label CB-like nuclear foci in a wide spectrum of organisms, showing that the CB is a highly conserved structure. While various lines of experiment suggest a role of the CB in snRNA and snoRNA maturation (reviewed by Gall, 2000), CBs also contain proteins involved in other pathways, such as nucleolar functions, tumourigenesis, and cell cycle regulation (Sleeman and Lamond, 1999; Jacobs et al., 1999; Liu et al., 2000, Ma et al., 2000). Therefore, CBs may also have other cellular functions that remain to be characterized.
This article describes an effective procedure for the large-scale isolation of CBs from mammalian somatic cell nuclei (Lam et al., 2002). The procedure involves disrupting HeLa cell nuclei by sonication, treatment with detergent, nuclease, and polyanion, and subsequent density gradient fractionation. Density separation is carried out using Percoll, a silica sol coated with polyvinylpyrolidone, which generates a density gradient on ultracentrifugation. It results in the enrichment of particles containing known CB factors that are comparable in size, morphology, and composition to CBs detected in situ. These particles, therefore, correspond to isolated CBs. Judging by both immunofluorescence and immunoblotting analyses, we estimate that this protocol provides an enrichment factor of at least 750- fold for isolated CBs, as compared to intact nuclei. The protocol is reproducible and can be carried out on a sufficiently large scale to generate sufficient material for biochemical analysis.
II. BUFFERS AND SOLUTIONS
All solutions are supplemented with Complete protease inhibitor tablet (Roche, Cat. No. 1-873-580) at a final concentration of 1 tablet/50ml).
S1 solution: 0.25M sucrose and 10 mM MgCl2
S2 solution: 0.35M sucrose and 0.5 mM MgCl2
S3 solution: 0.5M sucrose and 25 mM Tris-HCl, pH 9.0
SP1 buffer: 1M sucrose, 34.2% Percoll, 22.2mM Tris-HCl, pH 7.4, and 1.11 mM MgCl2
SP2 buffer: 20% Percoll, 10mM Tris-HCl, pH 7.4, 1% Triton X-100, and 0.5mg/ml heparin
HT buffer: 10 mM Tris-HCl, pH7.4, 1% Triton ×100, and 0.5 mg/ml heparin
See Section IV on making sucrose stock solution.
III. PROCEDURES
All procedures should be performed either on ice or at 4°C.
A. Sonication
- Prepare the starting material of 2.5 × 10⁹ HeLa nuclei. Suitable HeLa nuclei can be purchased from CIL Biotech (Mons, Belgium; Cat. No. CC-01-30-25). Add S1 solution to thawed nuclei to a final volume of 30ml. Mix thoroughly but avoid vigorous vortexing.
- Divide the diluted nuclei into 2 × 15 ml portions. Overlay each portion onto 15 ml of the S2 solution in a 50-ml Falcon tube. Make sure the interface of the two layers is sharp (Fig. 1).
- Centrifuge at 1430g (2500rpm, Beckman GS-6 centrifuge, GH-3.8 rotor) for 5 min at 4°C.
- Carefully decant the supernatant. The pellets should be solid and firm (Fig. 1). Resuspend each pellet with the S2 solution so that the final volume is 30 ml. The pellets should resuspend easily. A pellet that cannot be resuspended completely indicates the presence of lysed nuclei and should be discarded.
- Divide resuspended nuclei into 10 × 3-ml portions, each in a 15-ml Falcon tube. In our experience, sonication is more effective with this sample size.
- Sonicate each aliquot using a tuned sonicator (Misonix XL 2020) for 3 × 6s, with a 6-s intermission between each burst. See Section IV on sonication.
- Examine the sonicated nuclei under a phasecontrast
microscope. The majority of nuclei should
have been lysed, while nucleoli should be clearly
visible. If the percentage of unlysed nuclei is too high
(over 5%), sonicate again for 2-3s and then reexamine
under the microscope. Stop at the point when most
nuclei are lysed. Over sonication disrupts CBs. The
conditions used to sonicate HeLa nuclei not only maintain
the structure of CBs, but also that of nucleoli (see Isolation of Nucleoli, this volume). PML bodies, and splicing
speckles. This indicates that, under suitable conditions,
many nuclear domains remain intact even after
the overall nuclear structure is destroyed.
 |
| FIGURE 1 Steps 2-3 of the procedure. Note the clear boundary between S1 and S2 layers before centrifugation. |
B. Removal of Nucleoli
- Pool the 10 aliquots back together. Measure the volume. Add 0.42× volume of 2.55M sucrose to sonicated nuclei so that the final sucrose concentration is now 1M. Mix thoroughly but do not vortex. Divide the mixture into two portions, approximately 20ml each, in two 50-ml Falcon tubes (Fig. 2).
- Centrifuge at 3000g (3500rpm, Beckman GS-6 centrifuge, GH-3.8 rotor) for 10min at 4°C.
- A small pellet should be visible in each tube (Fig. 2). This pellet contains nucleoli and unlysed nuclei, while the supernatant is nucleoplasm containing CBs. Using a pipette, collect the supernatant carefully. Do not decant, as the pellets are not firm. Stop when you are about 5 mm above the pellet. This is the region where the distinction between the pellet and the supernatent is blurred. This part of the supernatant should not be included in subsequent steps.
- To collect nucleoli for other experiments, resuspend the pellet with 3 ml S2. Sonicate the mixture for 3 × 10s. Proceed from step 7 of the nucleolar isolation protocol (see article by Lam and Lamond).
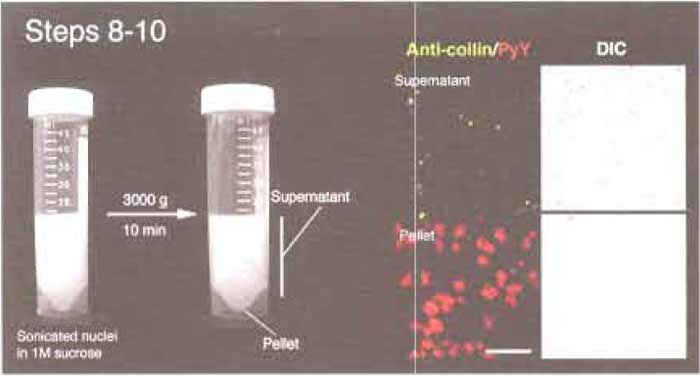 |
| FIGURE 2 Steps 8-10 of the procedure. Note the small pellet after centrifugation. (Right) Microscope images of the supernatant and pellet. Anticoilin antibodies (5P10, green) and pyronin Y (red) were used to label CBs and nucleoli, respectively. Bar: 10µm. |
C. Gradient One
- Measure the volume of the supernatant. Add 0.82× volume of SP1. For example, in a typical experiment, mix 37 ml of the supernatant with 30.27 ml SP1. Add 0.05x volume of 20% Triton X-100 (3.36ml in the aforementioned example). Mix thoroughly but do not vortex.
- Divide the mixture into precooled SW41 ultracentrifuge tubes (Fig. 3). The volume of the sample should fit six tubes perfectly. Balance the tubes carefully. Load the tubes into a precooled SW41 rotor. Transfer the rotor to a precooled ultracentrifuge.
- Ultracentrifuge at 37,000rpm for 2h.
- A loose pellet can be seen resting on the Percoll precipitate at the bottom of each tube (Fig. 3). This pellet contains most of the Cajal bodies. Carefully pipette away the turbid supernatant. Do not decant. Stop when you are 5-6 mm above the pellet. Keep the supernatant labeled as fraction 1S. Use a P1000 pipette and resuspend the pellets in the remaining supernant. Transfer the resuspended pellets to a 15-ml Falcon tube. This is fraction 1P. Measure the final volume of fraction 1P. In a typical experiment, the final volume is about 5ml. In fraction 1P, the CBs present are mostly entangled with large pieces of chromatin, as revealed by DAPI staining. Nucleoli that have not been removed in the first step are also a significant contaminant.
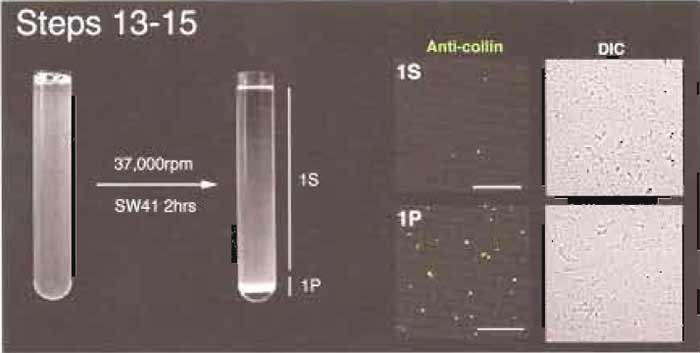 |
| FIGURE 3 Steps 13-15 of the procedure. Note the loose pellet (1P) after centrifugation. Immunofluorescence (right) shows that most CBs are in 1P. Bar: 10µm. |
D. Gradient Two
- Add 600 units of DNasel (Sigma Cat. No. D4527; 20,000 units/ml) to fraction 1P. Mix with a rotating wheel for 1 h at room temperature.
- Add 0.05× volume of heparin (10mg/ml). The mixture should become more transparent on mixing.
- Add 1× volume of SP2. Mix gently with a rotating wheel for 1 min.
- Load the mixture in precooled tubes suitable for SW55 rotor (Fig. 4). In a typical experiment, the mixture fits two tubes perfectly. Ultracentrifuge at 45,000 rpm for 1 h.
- Three bands should be visible (Fig. 4). A broad white band floats on the top, a thin white band at the middle, and a pellet resting on the Percoll precipitate at the bottom. Using a P1000 pipette, very carefully unload the gradient from the top. Take the top band and go on until you are 2-3 mm above the middle band. This is fraction 2.1. Using a new pipette tip, take the middle band (fraction 2.2). Finally, resuspend the pellet using the remaining part of the gradient. This is fraction 2.3. For each 5-ml gradient, typical volumes of the three fractions are fraction 2.1, 2.5ml; fraction 2.2, 1 ml; and fraction 2.3, 1.5 ml. Most of the CBs are contained in fraction 2.2 in the middle of the gradient, where the resolution is the greatest.
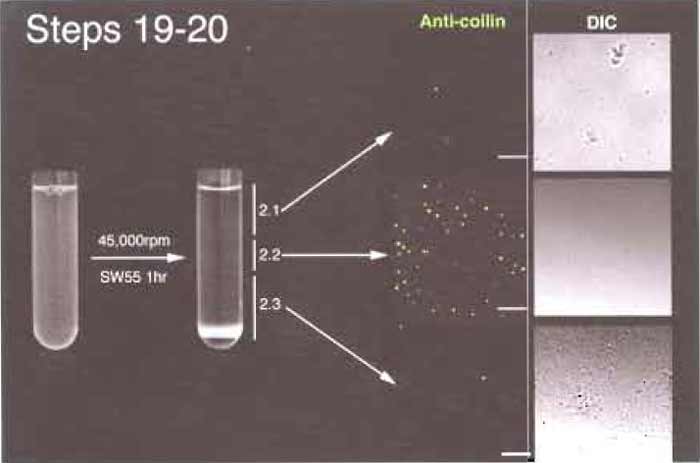 |
| FIGURE 4 Steps 19 and 20 of the procedure. Note the thin band (2.2) in the middle of the gradient after centrifugation. Bar: 10µm. |
E. Concentration and Final Enrichment of Cajal Bodies
- Add 10× volume of HT buffer into fraction 2.2. Mix well using a rotating wheel.
- Either load the diluted fraction into 2 × SW41 tubes and ultracentrifuge at 12,000rpm for 15 min or divide the mixture into 20 × 1.5-ml Eppendorf tubes and centrifuge at 14,000rpm for 15min in an Eppendorf centrifuge (Fig. 5).
- Remove the supernatant carefully. Resuspend the pellet in 0.5 ml HT buffer. Pool all the resuspended pellets into a single tube and centrifuge again as described earlier. The final pellet should be visible, but very small. Remove the supernatant carefully.
- Resuspend the pellet with 0.5ml S3 solution. The pellet detaches from the bottom of the tube and is resuspended on pipetting up and down.
- Spin down the resuspended pellet in an Eppendorf centrifuge at 8000rpm for 5 min. A visible pellet should be seen. Carefully take the supernatant and transfer it to a new Eppendorf tube. Repeat spinning the supernatant at 8000rpm for 5 min. Carefully take the supernatant and transfer it to a new Eppendorf tube.
- Combine the pellets. Label this fraction 3P.
- Dilute the supernatant with 10× volumes of 25mM Tris-HCl, pH 9.0. Divide the diluted supernatant into 3 x 1.5-ml Eppendorf tubes. Centrifuge at 14,000rpm for 15 min. Remove the supernatants carefully, leaving about 0.1 ml at the bottom of each tube. Pipette the remaining supernatants up and down, resuspending the small pellet. Mix the contents of the three tubes together. Fill up the tube with 25mM Tris-HCl, pH 9.0, and centrifuge again at 14,000rpm for 15 min. Remove the supernatant carefully, leaving about 20µl in the tube. Pipette the remaining supernatants up and down to resuspend the small pellet. Label this fraction 3S. This fraction contains enriched CBs.
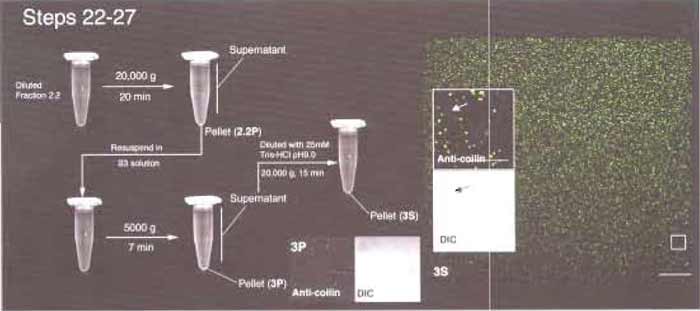 |
| FIGURE 5 Steps 22-27 of the procedure. Most CBs are found in fraction 3S. (Inset) Arrows indicate the presence of a small amount of coilin-negative material in 3S. Bars: 25 µm (large inset) and 10 µm (small insets). |
IV. NOTES
1. Making 2.55M Sucrose Stock
Here is a protocol for preparing a sucrose stock solution (Cline and Ryel, 1971) suitable for the nucleolar isolation protocol. The resulting solution is 2.55M, or 66% by weight. Its density is 1.3224 g/cm3 at 20°C, and the refractive index is 1.4558. The stock solution is stable indefinitely at 4°C. This procedure can be carried out at room temperature. There is no need to heat up the solution to help dissolve the sucrose. Heating up an incompletely dissolved sucrose solution can lead to charring of sucrose and affect the quality of the sucrose solution.
- Weigh out 1710 g sucrose (BDH). Keep it aside in a clean container.
- Put exactly 900ml water and a magnetic bar in a 5-1itre beaker. Put the beaker on a stirrer and start stirring.
- Add one-third of the sucrose into the beaker. Make sure the magnetic bar is rotating freely. Stir for 1 h.
- Add another one-third of the sucrose into the solution. Again make sure the rotation of the stir bar is not impaired. Stir for another 1 h.
- Add the remaining sucrose. Stir for another 1 h or until all the sucrose has gone into solution. The final volume should be exactly 2 litres.
2. Sonication
We use a Misonix 2020 sonicator fitted with a microtip at power setting 5. To ensure reproducible soncation, the following points should be followed.
- It is necessary to tune the sonicator every time after you change the probe. Follow the manufacturer's manual for the tuning procedure.
- Sonication produces intense and localized heat in the solution. If you are concerned about the heating, the correct way to reduce heating is to shorten the sonication time and to increase the intermission between bursts. Keeping the tube on ice or performing the sonication in the cold room is helpful, but is not the most effective way of heat control.
- If the probe is too close to the liquid surface, it produces a foam and reduces the efficiency of sonication. Make sure the probe is well submerged in the solution, about 5 mm above the bottom of the tube. Do not, however, touch the bottom or the wall of the tube with the probe.
- A sonicator probe that has been used repeatedly develops pits on its end. The sonication efficiency gradually decreases as time goes on. Therefore, the sonication time recommended here can only be used as a guideline. Always monitor the outcome of sonication using a phase-contrast microscope. You may need to adjust the sonication time to maintain the efficiency, especially if the probe is getting old. Change the probe when the efficiency is noticeably down.
3. Analysis of the Enriched Cajal Body Fraction
- To immunolabel the isolated CBs, spot about 5 µl of fraction 3S onto a polylysine-coated slide (BDH Cat. No. 406/0178/00) and air dry the spot. Rehydrate the slide in PBS for 5 min before using the standard immunostaining procedure.
- To separate and analyse the proteins by SDS-PAGE, resuspend directly either in Laemmli SDS sample buffer or in your preferred buffer.
References
Andrade, L. E., Chan, E. K., Raska, I., Peebles, C. L., Roos, G., and Tan, E. M. (1991). Human autoantibody to a novel protein of the nuclear coiled body: Immunological characterization and cDNA cloning of p80-coilin. J. Exp. Med. 173(6), 1407-1419.
Cajal, S. (1903). Un sencillo metodo de coloracion seletiva del reticulo protoplasmatico y sus efectos en los diversos organos nerviosos de vertebrados e invertebrados Trab. Lab. Invest. Biol. 2, 129-221
Cline, G. B., and Ryel, R. B. (1971). Methods Enzymolo., 22, 168-204. Gall, J. (2000). Cajal bodies: The first 100 years. Annu. Rev. Cell Dev. Biol. 16, 273-300.
Jacobs, E. Y., Frey, M. R., Wu, W., Ingledue, T. C., Gebuhr, T. C., Gao, L., Marzluff, W. E, and Matera, A. G. (1999). Coiled bodies preferentially associate with U4, Ull, and U12 small nuclear RNA genes in interphase HeLa cells but not with U6 and U7 genes. Mol. Biol. Cell 10(5), 1653-1663.
Lam, Y. W., Lyon, C. E., and Lamond, A. I. (2002). Large scale isolation of Cajal bodies from HeLa cells. Mol. Biol. Cell. 13, 2461-2473.
Liu, J., Hebert, M. D., Ye, Y., Templeton, D. J., Kung, H., and Matera, A. G. (2000) Cell cycle-dependent localization of the CDK2-cyclin E complex in Cajal (coiled) bodies. J. Cell Sci. 113(Pt. 9), 1543-1552.
Ma, T., Van Tine, B. A., Wei, Y., Garrett, M. D., Nelson, D., Adams, P. D., Wang, J., Qin, J., Chow, L. T., and Harper, J. W. (2000). Cell cycle-regulated phosphorylation of p220(NPAT) by cyclin E/Cdk2 in Cajal bodies promotes histone gene transcription. Genes Dev. 14(18), 2298-2313.
Sleeman, J., and Lamond, A. (1999). Nuclear organization of premRNA splicing factors. Curr. Opin. Cell Biol. 11(3), 372-377
Support our developers


