Field Emission Scanning Electron Microscopy and Visualization of the Cell Interior
I. INTRODUCTIONResolution in scanning electron microscopy (SEM) has improved dramatically in recent years so that for the majority of biological material, no significant differences exist in resolution between SEM and conventional transmission electron microscopy (TEM). High brightness sources (field emission) and novel final lens configurations have resulted in instrument resolutions of 0.5 to l nm, allowing direct, in situ, threedimensional visualization of surface detail at molecular resolution. As all this technology relies on field emission sources of the electron beam, either by "cold" field emission or thermally assisted "Schottky" field emission, we refer to it as FESEM.
Surface imaging allows bulk samples to be examined without limitation of specimen thickness. Visualization of intracellular surfaces requires some means of access, such as isolation of cell fractions or macromolecules, or in situ, via fracture, or sectioning techniques. Cell-free systems, e.g., in vitro nuclear formation, allow biological interfaces such as developing nuclear envelopes to be imaged directly (Goldberg et al., 1992). True three-dimensional (3D) surface visualization can be achieved by tilting the specimen to make stereo pairs, and accurate surface measurements can be made from computerized 3D reconstructions. The surfaces can be characterized further by immunogold labeling, which can be unequivocally localized by the strong backscatter signal of the gold probes. For specimens that are thin enough to allow electron penetration, a scanning TEM (STEM) image can also be obtained readily and displayed simultaneously alongside the secondary electron image, producing complementary information from the transmitted beam/specimen interactions. The use of low accelerating voltages in FESEM has also been shown to be of advantage, reducing charging and penetration of the electron beam, but maintaining a high-resolution information content. High-pressure freezing, freeze substitution, and examination of cryohydrated specimens may all be used for FESEM (Muller and Hermann, 1990; Walther, 2003) but can be considered specialized and are not covered in this article, although we do describe the use of cryoultramicrotomy and cryoabrasion as techniques to access internal surfaces within the cell prior to conventional imaging by FESEM. Basically, we deal with techniques that rely on chemical preservation, followed by dehydration, critical point drying, and coating. Conventional SEM coating (up to 20nm thickness) with sputtered gold completely obscures fine surface detail in HRSEM and must be replaced by high-resolution coating. We routinely coat with a 1- to 2-nm film of chromium or tungsten, which has a grain size of 0.3 to 0.5 nm (Apkarian et al., 1990).
II. MATERIALS AND INSTRUMENTATION
- Glutaraldehyde (Agar Scientific)
- Tannic acid (TAAB Laboratories)
- TCH (Cat. No. T-2137. Sigma)
- Osmium textroxide (Agar Scientific)
- Uranyl acetate (Agar Scientific)
- Molecular sieve (Merck Ltd.)
- Arklone (trichlorotrifluoroethane) Taab Labs UK
- HEPES (Sigma)
- PIPES (Sigma)
- Phosphate-buffered saline (PBS)
- Tris-HCl
- EDTA (Sigma)
- Phenylmethylsulfonyl fluoride (PMSF, Sigma)
- Percoll (Sigma)
- Sorensen's phosphate buffer
- Poly-L-lysine HBR, MW 150,000-300,000 (Cat. No. P-1399 Sigma)
- Glass coverslips, 5-7mm diameter
- Silicon chips, 5 × 5 mm2 (Agar Scientific Ltd.)
- Carbon-coated support grids
- Fine forceps for handling
- Microcentrifuge to spin suspended material onto coverslips
- Microcentrifuge tubes, 1.5ml, half-filled with polymerized EM resin, ideal for supporting coverslips, chips, and grids during specimen deposition by centrifugation
- High-resolution scanning EM. Conventional "pinhole" final lens instruments with field emission sources will allow subcellular imaging, as will conventional transmission instruments with scanning attachments. To date, the highest resolution achieved has been in field emission instruments with the facility to position the specimen in, or very close to, the final lens. Recent technology has significantly improved the resolution of field emission instruments at lower accelerating voltages (1 kV), from around 4 to 1.5 nm, facilitating imaging without the need for metal coating. The microscope should also be equipped with a suitable high-resolution backscatter detector for immunogold labeling. The main suppliers for these instruments are Hitachi, Jeol, Philips, and Leo.
- Critical-point drier, with high-purity CO2 (<5 ppm water). Liquid CO2 should be passed through a filter to remove water (Tousimis Research Corp., filter 8782).
- Coating units. Oxygen, hydrocarbons, and water vapor all adversely affect the grain size of chromium or tantalum deposited by sputter coating (Apkarian et al., 1990). We use an Edwards Auto 306 12-in. coating unit with cryopump, magnetron head, and suitable power source (Edwards High Vacuum International). Similar configurations using Denton HiVac and Balzers equipment with cold-trapped turbopumping have also been successful. Any system should use high-purity argon and have a shutter and a specimen table that tilts and rotates. Film thickness monitoring of coating deposition is an advantage. Several "benchtop" systems are currently on the market, many untested by the highest resolution. In our own very recent experience, the provision of a suitably performing coating system has often proved to be a limitation of the perceived performance of a newly acquired microscope, and suitable resources for a highresolution coating system should be incorporated in any application for a field emission instrument. If possible, get in touch with an established group and get advice before committing to any particular coating system.
Pitfalls
It is crucial to visit manufacturers' demonstrations with the material that will be investigated to ascertain that suitable performance can be assured from the chosen equipment.
III. PROCEDURES A. Exposing Surfaces within the Cell
1. Subcellular Fractionation
Organelles and macromolecules can be isolated by standard procedures, possibly requiring subsequent modifications in the light of HRSEM visualization, which are beyond the scope of this article. Basically, the specimens must be undamaged by osmotic shock, proteolysis, or unsuitable isolation buffers. They must also be clean. The surface of organelles should, for instance, be free of attached cytoskeletal remnants or cytoplasmic contamination. Where the specimens are available as purified macromolecules or viruses, they may be deposited on carbon-coated TEM grids in the conventional manner and viewed by HRSEM. In this situation, TEM negative staining will usually be replaced by fixation for SEM and air drying replaced by critical-point drying followed by chromium coating. If a STEM detector is available, the virus/macromolecule can be recognized as a transmitted "reference image" after this protocol and compared directly with the secondary electron (SEM) image. The thin coating of chromium applied for the secondary electron imaging does not interfere with the STEM imaging.
Adhering Sample to Support
Many cell components naturally adhere to glass coverslips, silicon chips, or carbon support film on grids. Glass coverslips may be a useful initial prepar ative substratum, as they can be checked in the phasecontrast microscope for the density and distribution of specimens and for the progression of various protocols such as detergent extraction of cytoplasm. Once the isolation protocol is established, coverslips should be replaced with silicon chips as specimen substrates, as silicon is a conductive substratum in contrast to glass, an insulator, which can generate problems with charging in the SEM. Tissue culture cells will grow in identical fashion on silicon as they do on glass or plastic, and isolated cytosol or organelles will also adhere naturally to silicon in the same way as they do to glass. If samples are fixed in suspension it may be necessary to coat the support with poly-L-lysine to facilitate adherence. Different samples may require slight modification, but the basic technique is as follows (Fig. 1).
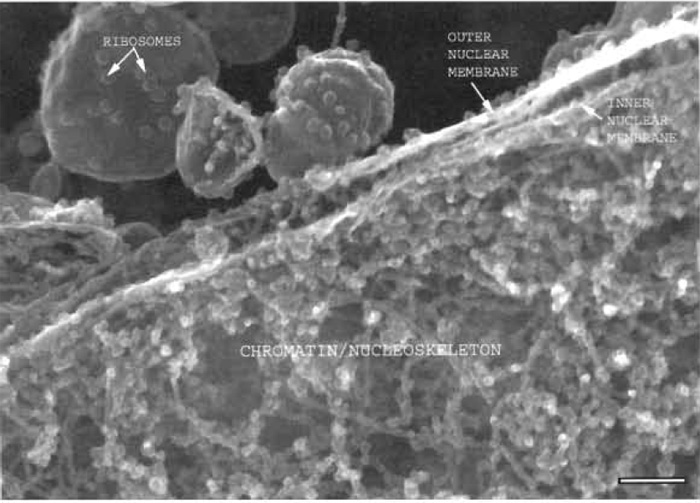 |
| FIGURE 1 Xenopus nuclear assembly egg extract spun onto a silicon chip, fixed, frozen, and sandpapered while frozen showing a section through the edge of a nucleus where the two membranes of the nuclear envelope can be seen, as well as the chromatin and nucleoskeletal fibres on the nuclear interior. Bar: 125 nm. |
Solution
Poly-L-lysine: Make a fresh 1-mg/ml solution of poly-L-lysine in sterile distilled water; use within 24h.
Steps
- Mark the surface of chip or coverslip with identification number using a diamond marker.
- Place a 50-µl drop of poly-L-lysine on coverslip or chip; allow to stand for at least 60min in a moist chamber to avoid drying. Rinse in sterile distilled water. The surface will retain its adhesive properties for up to 2 weeks in a refrigerator.
- Place a 50-µl drop of suspended material (fixed and rinsed) on coverslip/chip. Allow to settle and attach at 4°C and unit gravity in a moist chamber (1 h to overnight). Alternatively, spin directly (see isolation of nuclei) onto silicon chip.
- Allow bulk of drop to run off, put chip/coverslip back in fixative, and continue as for fresh tissue. Unfixed living samples (e.g., whole cells) may be distorted by poly-L-lysine. To spin down materials from suspension, use minicentrifuge tubes half-filled with polymerized EM resin to support the coverslip/silicon chip/grid.
2. "In Situ" Exposure of Intracellular Surfaces Dry Fracture
This is a simple but extremely effective way of exposing internal surfaces in both tissues and cells. After fixation, dehydration, and critical-point drying, merely gently press the surface of the specimen to a square of double-sided tape mounted to a second silicon chip and pull away without shearing, coat both chips as normal, and examine in the SEM. The fracture will remove material on the surface of the adhesive and leave fractured material "in situ.'" This technique may be enhanced by pretreatment with detergent (0.5% Triton X-100, 2-3min for tissue culture cells), either alone or mixed with the primary fixative (2.0% paraformaldehyde and 0.1% glutaraldehyde), and subsequently refixed as described (Allen et al., 1998).
Resinless Sections
These methods involve sectioning of embedded specimens followed by exposure of internal surfaces by removal of the supporting material. This may vary among epoxy resins, various waxes, and even ice. Resins that require corrosive solvents for removal will tend to be prone to surface etching. A mixture of 50% propylene oxide and 50% sodium methoxide (dissolve 2g NaOH pellets in 100ml absolute methanol) will remove most resins.
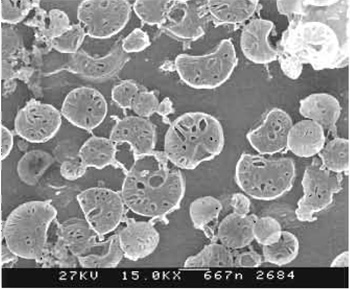 |
| FIGURE 2 Low-power image of cryo-planed block face of a mitochondrial pellet where the internal cristae structure has been exposed. Scale bar: 667 nm. |
3. Cryo Methods to Expose Internal Surfaces for FESEM
Surface imaging by FESEM may be achieved by isolating the cellular component of interest, such as mitochondria, but this approach does not allow access to the interior structure of such an organelle (see later). One way to expose such surfaces is to freeze the cells or tissue and cut cryo sections, which themselves can be viewed in the SEM, to "cryoplane" and expose the whole blockface in the SEM, or to "cryoabrade" the surface of the frozen sample and expose surface features in a different way. Samples are then thawed and processed for FESEM as normal. This gives a crosssectional view but with much greater depth of information than in a resin-embedded thin section viewed in the TEM because the sections can be very thick, they are resin free, and there is a greater depth of focus. Information can also be gathered quite simply in 3D simply by taking stereo pairs, which also allows computerized 3D reconstruction and measurement of the surface. This method is also compatible with immunogold labelling
(Fig. 2).
Cryomicrotomy is an adaptation of the widely used "Tokyasu" technique (Tokyasu, 1986, 89) for immuno-TEM.
Materials
Silicon chips
4% paraformaldehyde in PBS
2M sucrose in PBS
Cryo stubs
Liquid nitrogen
Cryo ulramicrotome (e.g., Leica Ultracut R with FCS cryo attachment)
Steps
- Fix samples (e.g., pellet of organelles) with 4% paraformaldehyde in PBS at room temperature for 30 min.
- If possible, trim to a cube of about 1 mm3.
- Transfer to 2M sucrose in PBS overnight at 4°C.
- Mount sample on cryo stub for ultramicrotome and wick off excess sucrose.
- Plunge into liquid nitrogen.
- Mount into a cryo ultramicrotome, which has been precooled to -100°C.
- Cut sections of 100-300 nm thickness.
- As in the Tokyasu technique, pick up sections off the knife on a drop of sucrose suspended from a loop, where they thaw, and then touch the sucrose drop to a silicon chip where the sections adhere.
- Place chip in PBS to wash off sucrose.
- This can then be immunogold labeled, refixed, and processed for FESEM.
Pitfalls
These problems are associated with the Tokuyasu technique.
- Poor infiltration of sample with sucrose leading to crumbly blocks.
- Curling of sections.
- Static.
- Frosting.
- Small sample size.
When processing the sample remaining on the pin for SEM, the specimen always detaches from the pin. This leaves a very small specimen that is easily lost during the dehydration and CPD steps. An additional problem is the attachment of the sample to a silicone chip after CPD. The sample is very fragile and it is not always easy to identify the "planed" side. Adhere the sample to the chip using a thin smear of silver dag. It is possible for the sample to flip over during this process. Also, because of the irregular shape of the sample, ensuring good contact and therefore a good earth path from specimen to chip can be tricky. It is easy to submerge the specimen in too much dag.
Cryo Abrasion
- Centrifuge organelles onto a silicon chip.
- Fix (e.g., 4% paraformaldehyde in PBS, room temperature for 30min).
- Transfer to 2M sucrose in PBS for 2h to overnight at 4°C.
- Remove from sucrose and place on filter paper to dry the back of the chip.
- Wick off most of the sucrose from the sample, leaving as thin a film as possible without drying.
- Plunge into liquid nitrogen.
- The sucrose step can be avoided if the sample can be frozen ultra-rapidly by plunging into liquid propane or ethane. The chip can then be held under liquid nitrogen or on a liquid nitrogen-cooled platform (such as the Leica EM CPC) while it is abraded with fine sandpaper (400-600 grade wet and dry abrasive as per automobile body and paintwork).
- Thaw into fix and process for FESEM.
Specific Protocol for Mitochondrial Isolation and Exposure of Internal Structure by FESEM
Isolate mitochondria using the differential centrifugation method (Gottlieb et al., 2003). Harvest and place cells
(2.5-5 × 10⁸) on ice for 15min, centrifuge at 500g for 5 min at 4°C, wash with ice-cold PBS, and subsequently wash with ice-cold mitochondrial isolation buffer (MIB) (200mM mannitol, 70mM sucrose, 1mM EGTA, 10mM HEPES, 0.5 mg/ml BSA; pH 7.4). Resuspend cells in ice-cold MIB and then homogenize in a syringe-driven cell disruptor. Spin the lysate at 800g for 10min at 4°C. Remove supematants and spin at 10,000g for 10min at 4°C. Add fixative (3% glutaraldehyde) to the pellets and keep samples at 4°C for 1h. Remove the fixative carefully and infiltrate the pellet with sucrose/PVP solution overnight (Tokuysau, 1989). During this process, leave the pellet undisturbed. Then carefully excise small (>1mm2) pieces of sample from the pellets and mount onto aluminium plunge freezing pins (Leica Microsystems, Milton Keynes). Mount the pins into a plunge freeze unit (Leica CPC) and freeze in liquid propane at a temperature of -182°C. Transfer the frozen specimen and pin under LN2 into a cryo ultramicrotome (Leica Ultracut S with FCS attachment). Using a diamond trimming knife (Diatome Cryotrim 45), trim several semithin sections (350 nm) from the sample in order to remove surface sucrose. Cut further semithin sections (350-400nm) from the sample using a diamond cryo knife. Collect each section on a sucrose loop according to the "Tokuyasu" technique (Tokuyasu, 1986). Thaw the frozen sections onto 5-mm silicone chips and process for SEM as follows.
- Transfer the chips with attached sections using a metal loop (2-3 mm diameter) and invert such that the chip is floated, section side down, in a plastic Petri dish (35-mm Falcon) containing double-distilled water.
- Wash 3x over 15min in order to rinse out the sucrose.
- Fix by floating in 1% OsO4 in double-distilled water for 1h.
- Wash in double-distilled water 3x for 5 min each.
- Then dehydrate the sections and critical point dry as described later.
Pitfalls
Aligning the cryo abrasive pad with the specimen is very tricky and must be done with care. It is very easy for the protruding abrasive shards of the wet and dry paper to embed themselves into the frozen block. Also, if the section advance is too great, the sample block can be literally ripped from the specimen pin. A few micrometres must be shaved off the sample face in order to ensure that all surface sucrose has been removed. This only leaves a few micrometres of wellfrozen vitrified sample to work with. Once again, the sample size is very small and is easily damaged or lost in subsequent processing and mounting steps.
Identifying the abraded face can be tricky even under a stereomicroscope. The swirled pattern of the specimen pin that has been embossed into the underside of the sample can look very similar to the abraded face, leading to the specimen being mounted pin side up.
B. Fixation
Solutions
All fixatives are ideally made up just before use or at least the same day; both glutaraldehyde and glutaraldehyde-tannic acid solutions should be filtered before use through a 0.22-µm filter. The 1% aqueous uranyl acetate should be stored in a brown bottle. Osmium tetroxide is made by breaking the glass ampoules in which the crystals are delivered, having previously washed them free of label and adhesive under the tap, in a fume cupboard. The ampoules plus crystals are dropped in the correct amount of buffer or distilled water where the osmium dissolves to give the appropriate final concentration. (Note: Osmium is extremely hazardous and appropriate precautions must be observed.) Thiocarbohydrazide or tannic acid solutions should also be made just prior to use (Allen et al., 1988).
Pitfalls
Always use glutaraldehyde of EM-grade quality from a high stock concentration (50%) stored in a freezer. Low concentration stock solutions and storage in large bottles at room temperature will reduce the cross-linking properties of the glutaraldehyde.
Steps
1. Isolated Proteins and Nucleoproteins
- Proteins and nucleoproteins on carbon support films on TEM grids may be floated on top of drops (25-50µl) of the appropriate solutions spread on Parafilm.
- Place in 1% glutaraldehyde in appropriate buffer for 10 min.
- Wash in double-distilled water for 5 min.
- Transfer to 1% uranyl acetate for 5 min.
- Transfer to 100% ethanol for 1-2 min.
- Air dry or critical point dry (see later).
2. Small and Easily Preserved Structures
Steps
- Fix in 3% glutaraldehyde in Sorensen's phosphate buffer for 30min.
- Wash in Sorensen's for 5 min.
- Postfix in 1% OsO4 (in Sorensen's for 30 min).
- Wash in double-distilled water for 5 min.
- Dehydrate through ethanol series for 5 min each.
- Place in Arklone for 5 min.
- Critical point dry (see later).
3. Large and/or Fragile Structures (e.g., Whole Cells, Organelles, Cytoskeletal Preparations, Isolated Cells, or Nuclear Membranes)
Steps
- Attach whole cells to specimen supports such as silicon chips and handle by changing the solutions in 35-mm-diameter petri dishes.
- Fix in 2% glutaraldehyde, 0.2% tannic acid, and 0.1% HEPES, pH 7.4, for 10min.
- Wash in double-distilled water for 5 min.
- Postfix in 0.1% OsO4 in water for 10min.
- Wash in water for 5 min.
- Stain with 1% aqueous uranyl acetate for 10min.
- Dehydrate through ethanol series and Arklone and critical point dry.
- Isolation of Nuclei from Tissue Culture Cells
Steps
- Take approximately 10 million tissue culture cells (usually from suspension culture), cool to 4°C and pellet in a swing-out centrifuge (1000g for 10min).
- Wash the pellet in PBS buffer and then resuspend in 8ml ice-cold swelling/shearing buffer (50mM Tris-HCl, pH 7.4, 5mM MgCL, 1.3mM EDTA, and 5mM phenylmethylsulfonyl fluoride added shortly before use) in which nuclei are allowed to swell for 5 min.
- Mechanically homogenize the cells using a plunger-type tissue grinder (e.g., Kontes Dounce), checking the number of strokes required for nuclear release by phase-contrast light microscopy (usually 10-20 strokes). Precool the plunger in ice prior to use. Alternatively, nuclei may be isolated by a single passage through a 26-G3/8 syringe needle (Microlance).
- Prepare a Percoll gradient as follows: use a 13.5-ml Beckman centrifuge tube filled with 0.86ml Percoll, density 1.130g/ml, 2.74ml 10mM Tris-HCl (pH 7.4), and 0.40ml 2.5M sucrose. Add density marker beads to monitor gradient, red beads (1.12g/ml) in Percoll containing 0.25M sucrose, and yellow beads (1.049 g/ml) in Percoll containing 0.25 M sucrose. Spin for 30 min at 30,000g at 4°C with a 60° angle head rotor; red beads will form a line 5 mm from the bottom of the tube, with the yellow beads a further 12 mm above.
- Gently layer the homogenate on top of the gradient and spin for 10min at 30,000g, which generates two bands from the homogenate. Damaged nuclei and whole cells are found in the upper band 7mm above the red beads, whereas the pure nuclear fraction is found 0.5 mm below the red beads. Remove this fraction and wash gently in 150mM Tris-HCl (pH 7.4) for 5 min at 4°C.
- Spin the isolated nuclei onto 5-mm poly-L-lysine-coated silicon slips. Spin the silicon chips in 1.5-ml Eppendorf tubes previously half-filled with polymerized resin. Overlay the Si chips with 0.5 ml of freshly isolated nuclear suspension and spin for 5 min at 1000g.
- Fix the whole chip (+nuclei) in 6% glutaraldehyde in 0.15M Sorensen's buffer for 20min, rinse gently in buffer, and postfix in 1% osmium tetroxide in 0.15M Sorensen's buffer for 1h. Dehydrate, critical point dry, and coat with 3-4nm of tantalum or chromium.
Pitfalls
- Low yield of nuclei. Dounce tissue homogenizers are produced with different clearance distances between the polished tube and the pestle. Some homogenizers are designed just to disrupt tissues as a necessary step prior to homogenization of nonsupension cells. Make sure that the clearance distance of the Dounce tissue homogenizer for the final release of the nuclei is small enough to disrupt whole cells. Some manufactures offer pestles with two different clearance distances to allow tissue disruption and release of the nuclei within one and the same tube. For certain cell types, making the buffer more hypotonic can help increase the yield of nuclei.
- Enzymatic degradation of structures. It is good practice to ensure cooling for every preparation step prior to the fixation of nuclei on silicon chips. Moreover, the homogenate should be processed without delay. Therefore, preparation of the Percoll gradient before homogenization is recommended. To ensure a suitable ratio between biological material and buffer, a homogenizer with a sufficient capacity (for 8ml) should be selected. Do not reduce the number of cells significantly to keep this ratio in a homogenizer with lower capacity, as this might cause problems with recognition of the nuclear layer after gradient centrifugation.
5. Preparation of in Vitro-Assembled Organelles for FESEM
Organelles, such as nuclei, endoplasmic reticulum (ER), and Golgi, can be assembled in cell-free extracts. Extracts made from frog eggs are a particularly powerful system for studying the assembly, dynamics, and functions of these organelles. Organelles can be isolated cleanly from the extract and their surfaces can be examined by FESEM. In vitro-assembled nuclei, as well as ER, can be prepared for FESEM as follows.
Solutions
- Membrane wash buffer (MWB): 250mM sucrose, 50mM KCl, 50mM HEPES-NaOH (pH 8.0), 1µg/ml aprototin, and 1 µg/ml leupeptin
- Fix buffer: 150mM sucrose, 80mM PIPES-KOH (pH 6.8), 1 mM MgCL, 2% paraformaldehyde, and 0.25% glutaraldehyde
Steps
- Prepare Xenopus egg extracts (Newmeyer and Wilson, 1991) and incubate extract with demembranated Xenopus sperm chromatin to assemble nuclei. ER and Golgi will also assemble in the same extract.
- After the required time, remove a 4-µl extract, place in a 1.5-ml Eppendorf tube, and resuspend very gently in 1 ml of MWB. At this stage, centrifugation of in vitro nuclei and organelles onto 5-mm2 silicon chips requires a simple modification of the 1.5-ml Eppendorf centrifuge tubes as follows. Remove lid from tube and cut tube with a sharp knife at a level where the cut end fits tightly into the lid, thus creating a "flat-bottomed" tube. Snap the cut end into the lid, having placed a silicon chip in the lid first.
- Pipette the 1ml of MWB containing the extract into the modified tube, spin in a swing-out rotor, inside a 10-ml centrifuge tube (with a single tissue as cushion), and spin for 10min at 4°C or room temperature at 2000g. Some leakage of the suspension at the joint between the cut end of the tube is not a problem at this point.
- Pipette off most of the buffer, break open the tube, and remove the chip. Place the chip in 5ml of fix buffer in a small petri dish for 10min at room temperature.
- Wash chip in 0.2M cacodylate (pH 7.4), place in 1% OsO4 in 0.2M cacodylate for 10min, wash twice in distilled water, and place in 1% aqueous uranyl acetate for 10min (at room temperature) and then dehydrate, critical point dry, etc.
C. Critical-Point Drying
All traces of water should be removed from ethanol, Arklone, and CO2. Let 100% ethanol and Arklone stand over molecular sieve for more than 24h prior to use. High-purity liquid CO2 (less than 5 ppm water) should be used and passed through a water filter as a precaution.
Steps
- Exchange Arklone for CO2.
- Flush six times.
- Leave in CO2 for 30min.
- Flush six times.
- Raise temperature to 40°C.
- Release gas slowly (over about 15-20min).
- Transfer to coating unit as soon as possible.
Pitfalls
Critical-point-dried samples should be transferred immediately into the sputter coater to avoid rehydration, and coated samples are best viewed in the microscope directly. However, if it is known that the microscope cannot be accessed, it is better to pause preparations after critical-point drying and store preparations under vacuum.
D. Sputter Coating
Steps
- Pump specimen to at least 5 × 10⁻⁷mbar.
- Introduce high-purity argon to a pressure of 8 × 10⁻³mbar.
- Start specimen rotation (60rpm).
- Sputter at 50-100mA current (voltage 450V) and 60rpm; specimen table should be tilted at 30°. Presputter onto the shutter for 20-60s to remove the chromium oxide layer from the target.
- Open shutter and deposit 2nm chromium as indicated by a film thickness monitor (usually 20-30s).
- Examine in microscope as soon as possible, preferably within a day or two. Coatings are variable according to the specimen, but a general rule is that they deteriorate with time, usually over a few days to about 2 weeks.
E. Microscopy
Steps
- A liquid nitrogen-cooled decontaminator (if present) should always be used; this is more likely to be fitted on an "in-lens" electron optical column configuration. Many recent field emission instruments are of conventional "pinhole configuration," but with very short working distances to optional decontamination devices.
- Spot size and apertures should be as small as possible, consistent with a sufficient signal to visualize high resolution of specimen at photographic collection rates (e.g., 40-s scans).
- An appropriate accelerating voltage must be selected. High-resolution scanning electron microscopes usually work in the range of 1-30kV. Instrument resolution decreases with decreasing accelerating voltage; however, at high voltage there may be problems with charging and specimen penetration, leading to a nonspecific signal from below the specimen surface. At low voltage, penetration and charging are reduced, but so are resolution and signal. Signal is generated almost completely from the surface at 1.0 kV so there is no problem of a "bulk" signal from underlying structures. In general, we use high kilovolts for thin and conductive specimens and lower kilovolts for bulky or less conductive specimens; however, a wide range of kilovolts should be experimented with for each type of sample. The more recently produced field emission instruments have vastly improved low kilovolt performance, and specimens that have some inherent conductivity as a result of osmium fixation can be viewed uncoated at low kilovolts, without compromising signal and resolution.
F. Immunogold Labeling
The basics of specimen preparation for immunogold labeling are beyond the length limits for this article and are adequately covered elsewhere (see article by Roos et at. for additional information). For immunogold labeling for HRSEM, the following points are important.
1. Size of Probe The choice of probe size is a compromise between sensitivity and subsequent detection. Very small gold probes (around l nm) have minimal steric hindrance and consequently label with maximum sensitivity. One-nanometer gold has been visualized by backscatter imaging in HRSEM (Hermann et al., 1991), but this is at the limits of resolution and is best increased in diameter in situ by silver or gold enhancement to a size at which it can be visualised more easily (around 5-10nm). We have used both 5- and 10-nm gold as a good compromise between sensitivity and localization. Because most modern instruments will discriminate easily between 5- and 10-nm labeling, these can be used together successfully for double-labeling studies.
2. Coating
Using gold probes obviously prohibits gold coating for SEM. In the past, gold-labelled specimens have been coated with carbon, mainly to inhibit charging, but carbon produces a severely limited secondary electron signal and, consequently, little topographical information. We have found that a 1.5-nm chromium coating provides the ideal solution, retaining the full secondary electron-generated surface information, without compromising the detection of gold by backscattered electron detection (Allen and Goldberg, 1993).
In this situation, having found that "mixed" imaging of SE and BSE signals was not satisfactory, we have chosen to collect each signal separately (but simultaneously) and then to superimpose the gold BSE signal onto the secondary signal (retaining register) in Adobe Photoshop, often altering the colour to improve the appearance of label against the monochrome background. In modern instruments with good low kilovolt performance, uncoated or carbon-coated imaging will generate such a strong signal from gold probes that they are observed easily in secondary electron imaging.
IV. COMMENTS
Although field emission SEM has been available for some time, it is still a relatively new technique in cell biology. The procedures given here may need to be modified to optimize the preservation of some structures. Probably the most difficult step is exposing recognizable and undamaged intracellular surfaces. Isolation of organelles offers the possibilities of further characterization by other methods, but gives no "in situ" information and may involve extensive biochemical protocols. Resinless sections and dry fracture give in situ information, but only after some initial extraction of the cell. Freeze fracture, followed by frozen hydrated coating and visualization, may alleviate these problems but is limited by the plane of fracture, as the structure of interest may not be exposed. It is also technically difficult and expensive. Osmium etching results in spectacular images of intracellular membranes, but the uncertainty of what is removed makes interpretation difficult. Direct visualization of biological interfaces in cell-free systems (e.g., in vitro nuclear formation) is a particularly promising area (Goldberg et al., 1992, 1997). Considerable fresh structural information has also been demonstrated for nuclear pore complexes and associated structures (Ris, 1991; Goldberg and Allen, 1992, 1996; Kiseleva et al., 1996).
Acknowledgments
T. D. Allen, S. Rutherford, and S. Murray are supported by CRUK and M. W. Goldberg is supported by a Wellcome Lectureship. The mitochondrial pellets were supplied by Dr. E Gottlieb (Beatson Institute).
References
Allan, V. J., and Vale, K. (1994). Movement of membrane tubules along microtubules in vitro, J. Cell. Sci. 107, 1885-1895.
Allen, T. D., and Goldberg, M. W. (1993). High resolution SEM in cell biology. Trends Cell Biol 3, 203-208.
Allen, T. D., Jack, E. M., and Harrison, C. (1988). Three dimensional structure of human metaphase chromosomes determined by scanning electron microscopy. In "Chromosomes and Chromatin" (K. W. Adolph, ed.), Vol. 11, pp. 52-70. CRC Press, Boca Raton, FL.
Allen, T. D., Rutherford, S. A., Bennion, G. R., Wiese, C., Riepert, S., Kiseleva, E., and Goldberg, M. W. (1998). Three dimensional surface structure analysis of the nucleus. Methods Cell Biol. 53, 125-138.
Apkarian, R. P., Gutekunst, M. I., and Joy, D. C. (1990). High resolution SEM study of enamel crystal morphology. Electron Microsc. Tech. 14, 70-78.
Goldberg, M. W., and Allen, T. D. (1992). High resolution scanning electron microscopy of the nuclear envelope: Demonstration of a new regular, fibrous lattice attached to the baskets of the nucleoplasmic face of the nuclear pores. J. Cell Biol. 119, 1429- 1440.
Goldberg, M. W., and Allen, T. D. (1996). The nuclear pore complex and lamina: Three dimensional structures and interactions determined by field emission in lens scanning EM. J. Mol Biol. 257, 848-865.
Goldberg, M. W., Blow, J. J., and Allen, T. D. (1992). The use of the field emission in-lens scanning electron microscope to study the steps of assembly of the nuclear envelope in vitro. J. Struct. Biol. 108, 257-26.S.
Goldberg, M. W., Wiese, C., Allen, T. D., and Wilson, K. L. (1997). Dimples, pores, star rings and thin rings on growing nuclear envelopes: Evidence for structural intermediates in nuclear pore complex assembly. J. Cell Sci. 110, 409-420.
Gottlieb, E., Armour, S. M., Harris, M. H., and Thompson, C. B. (2003). Mitochondrial membrane potential regulates matrix configuration and cytochrome c release during apoptosis. Cell Death Differ. 10, 709-717.
Hermann, R., Schwartz, H., and Muller, M. (1991). High precision immunostaining electron microscopy using Fab fragments coupled to ultra-small colloidal gold. J. Struct. Biol. 107, 38-47.
Kiseleva, E., Goldberg, M. W., Daneholt, B., and Allen, T. D. (1996). RNP export is mediated by structural reorganisation of the nuclear pore basket. J. Mol. Biol. 260, 304-311.
Muller, M., and Hermann, H. (1990). Towards high resolution SEM of biological objects. In "Proceedings 12th International Congress on Electron Microscopy" (L. D. Peachy, D. R. Williams, eds.). Vol. 3, pp. 4-5. San Francisco Press, San Francisco.
Newmeyer, D. D., and Wilson, K. L. (1991). Egg extracts for nuclear import and nuclear assembly reactions. In "Methods in Cell Biology" (B. K. Kay, H. B. Peng, eds.), Vol. 36, pp. 608-635. Academic Press, San Diego.
Reipert, S., Reipert, B. M., and Allen, T. D. (1994). Preparation of isolated nuclei from K562 haemopoietic cell line for high resolution scanning electron microscopy. Microsc. Res. Tech. 29, 54-61.
Ris, H. (1991). The three dimensional structure of the nuclear pore complex as seen by high voltage electron microscopy and high resolution low voltage scanning electron microscopy. EMSA Bull. 21, 54-56.
Tokyasu, K. T. (1986). Application of cryomicrotomy to immunocytochemistry. J. Microsc. 143, 139-149.
Tokuyasu, K. T. (1989). Use of poly(vinylpyrrolidone) and poly(vinyl alcohol) for cryoultramicrotomy. Histochem. J. 21, 163-171.
Walther, P. (2003). Recent progress in freeze-fracturing of high pressure frozen samples. J. Microsc. 212, 34-43.
Support our developers


