Establishment of Embryonic Stem Cell Lines from Adult Somatic Cells by Nuclear Transfer
I. INTRODUCTIONUsually, embryonic stem (ES) cells are established from fertilized embryos. Recent studies have shown that it is possible to produce cloned embryos from adult somatic cell nuclei; even with a low success rate, some of those embryos can develop to full term (Wakayama et al., 1998, 2000a). Now, using this technique, it has become possible to create a new embryonic stem (ES) cell line via nuclear transfer (ntES cell line) from adult somatic cells (Munsie et al., 2000; Wakayama et al., 2001). These ntES cells differentiate not only all three embryonic germ layers in vitro, but also germ cells in vivo, and some ntES cell nuclei can develop to full term after a second nuclear transfer (Wakayama et al., 2001). The ntES cell techniques could be useful for research tools used in reprogramming, imprinting, and gene modification (Wakayama et al., 2002). "Whereas the ntES technique is expected to have applications in regenerative medicine without immune rejection, we demonstrated that it is also applicable to the preservation of genetic resources of mouse strains instead of an embryo, oocyte, or spermatozoon. At present, this technique is the only one available for the preservation of valuable genetic resources from mutant mouse without germ cells (Wakayama et al., 2005a,b)."
II. MATERIALS AND INSTRUMENTS
A. Mouse Cloning Medium
KSOM (long-term culture medium) from Specialty media (#MR-106-D). All others are obtained from Sigma unless otherwise mentioned. NaCl (S7653), KCl (P9327), CaCl2.2H2O (C5080), MgSO4.7H20 (M5921), KH2PO4 (P5379), D-glucose (G8769), NaHCO3 ($5761), sodium lactate 60% (ml/liter) (L1375), HEPES-Na (H3784), EDTA-2Na (ED2SS), phenol red (P0290), cytochalasin B (C6762), SrCl2 (S0390), polyvinylpyrrolidone (PVP; 360kD) (PVP-360), polyvinyl alcohol (PVA) (P8136), bovine serum albumin (BSA, A3311), dimethyl sulfoxide (DMSO, D8779), hyaluronidase (H4272), and mineral oil (M5310).
B. ES Cell Establishment and Medium Maintenance
Acidic tyrode solution (MR-004-D), DMEM (SLM- 120-B), phosphate-buffered saline (PBS) Ca/Mg free (BSS-1006-B), 0.1% gelatin (ES-006-B), nucleosides (ES-008-CD), nonessential amino acid (TMS-001-C), 2-mercaptoethanol (ES-007-E), penicillin-streptomycin solution (TMS-AB2-C), trypsin/EDTA solution (SM- 2000-C), mitomycin C (Sigma, 0503): fetal calf serum (FCS, ES-009-B), KSR (invitrogen, 10828-028) and Lif (GIBCO #13275-029); Specialty media (http://www. specialitymedia.com) can provide most of these solutions.
C. Instruments
Inverted microscope with Hoffman optics is from Olympus (IX71) or Nikon (TE2000). Micromanipulator set is from Narishige (MMO-202ND) (Fig. 1A). Piezo impact drive system is from Prime Tech (PMM-150FU) (Fig. 1B). Pipette puller is from Sutter Instrument Company (P-97). CO2 incubator, centrifuge, pipettes, and tissue culture dishes/flasks are also needed.
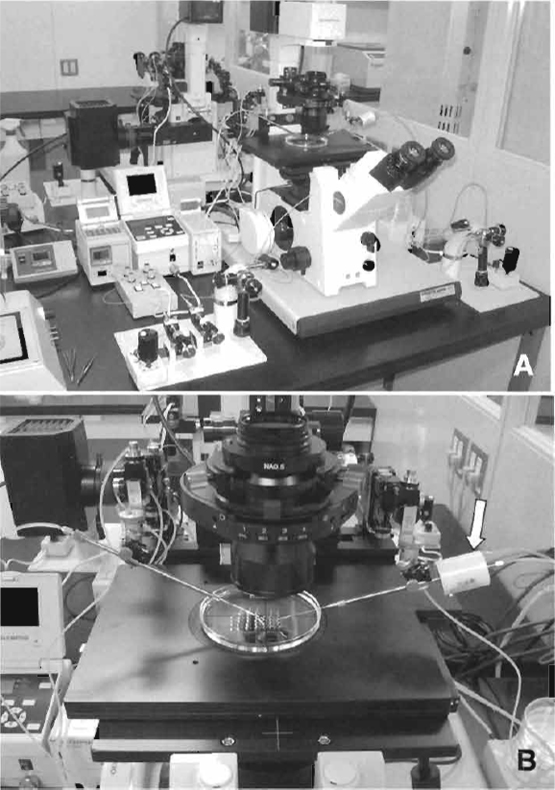 |
| FIGURE 1 Micromanipulator and piezo system. (A) Equipment includes an inverted microscope with Hoffman optics, two injectors, air cushion, and warming plate on the stage of the microscope. (B) Piezo impact unit attached to the injection pipette holder (arrow). |
 |
|
|
III. PROCEDURES
A. Preparation of Medium
1. KSOM
Thaw the freezing KSOM medium inside a refrigerator overnight. After thawing, aliquot in 5-ml disposable tube and keep at 4°C Make about 10 tubes and use a new tube every day. Tubes can be used 2 weeks after thawing.
2. CZB-HEPES (Embryo Handling and Nuclear Injection Medium)
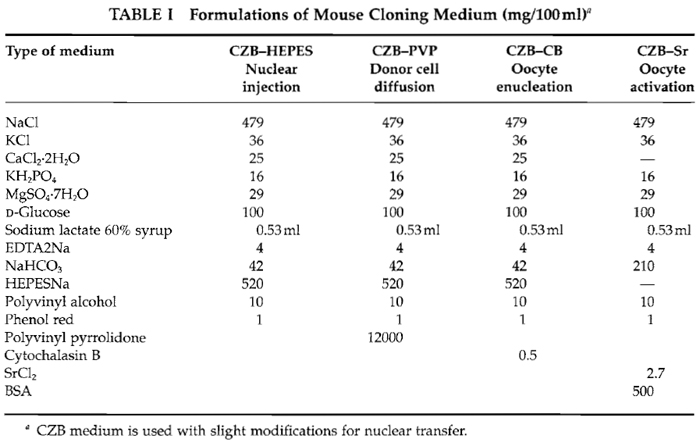
Basically, the CZB medium (Chatot et al., 1990) is used with slight modifications during in vitro manipulations. As shown in Table I, all drugs must mix into 99 ml distilled water (finally becoming 100 ml). After everything is mixed adjust pH to about 7.4-7.6 using 1N HCl and 1N NaOH. Sterilize with 0.45-µm filters and aliquot into 5-ml tubes the same as KSOM.
3. CZB-PVP (Donor Cell Diffusion and Pipette-Washing Medium)
Add PVP in CZB-HEPES medium and keep in the refrigerator overnight and then filtrate and aliquot in a 1-ml tube.
4. CZB-CB (Oocyte Enucleation Medium)
Dissolve 1 mg cytochalasin B in 2 ml DMSO as stock solution (100 times concentration) and store at-20°C Take 10 µl of this stock solution and mix with 990 µl of CZB-HEPES.
5. CZB-Sr (Oocyte Activation Medium)
As shown in Table I, this medium is similar to CZB but includes SrCl2 and BSA instead of calcium and HEPES. After mixture, filtrate and aliquot in a 1-ml tube.
6. For ES Cell Establishment
All media can be obtained from Specialty media. "After mixing all solutions, add FCS (for culture, 20%) or knockout serum (KSR; for ntES cell establishment, 20%) and filtrate."
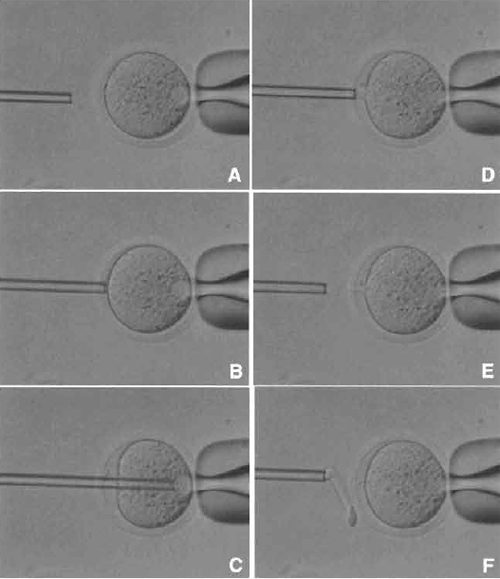 |
| FIGURE 4 Oocyte enucleation. (A) Rotate and find the metaphase II spindle and place it in the 8 to 10 o'clock position. Then hold this oocyte on the holding pipette. (B) Cut the zona pellucida using an enucleation pipette with piezo pulses. (C) Insert enucleation pipette until it reaches the spindle. (D) Remove the spindle by suction without breaking the plasma membrane and gently pull away the pipette from oocytes. (E) The stretched cytoplasmic bridge from oocytes to pipette was pinched off. (F) Push out the spindle in order to check enucleation, which is harder than cytoplasm. |
- Holding pipette: The diameter of the outer pipette should be smaller than the oocyte. If the holding pipette is larger than the oocyte, you will lose the oocyte metaphase II spindle when the oocyte is caught by the holding pipette.
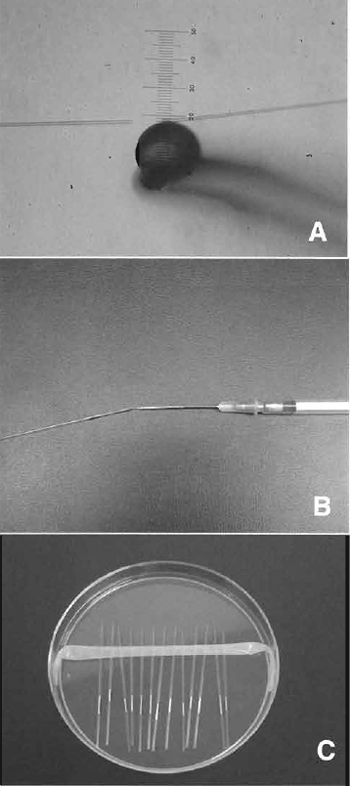
- Enucleation/injection pipette: Break the tip of the pipette at flat, vertical and blunt ends using a microforge (Narishige Cat. No. MF-900) (Fig. 2A). A notched tip often kills the oocyte during enucleation and injection. The inner diameter of the enucleation pipette is about 8 btm and the injection pipette depends on the cell type (e.g., for cumulus cell: 5-6 µm, for fibroblast or ES cell: 6-7 µm, for G2/M phase cell: 7-8 µm).
- Bend the pipette very close to the tip at 15-20° by the microforge.
- Load a small mount of mercury into the enucleation/ injection pipette, which is not essential but enhances the piezo impact power and control (Fig. 2B).
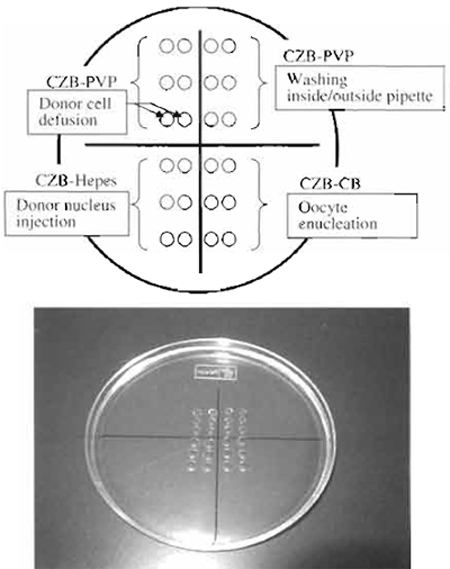
- Manipulation chamber: As shown in Fig. 3, different media were put on the dish and then covered with mineral oil. This chamber can be use for both enucleation and injection.
- Attach these pipettes to the pipette holder of the piezo impact drive unit of the micromanipulator (Fig. 1B).
- Expel the air, oil, and mercury from the enucleation/ injection pipette under CZB-PVP medium. Wash inside/outside of the pipette with the PVP medium, until inside wall of pipette becomes smooth. Without this washing, the enucleation / injection pipette becomes dirty quickly and needs to be changed.
C. Collection of Oocytes and Enucleation
- Collect the oocyte/cumulus cell complex from ampullae of the oviduct 14-15h after hCG injection and move that complex into hyaluronitase (0.1%) containing CZB-HEPES medium. About 10 min later, pick up oocytes and keep in KSOM in the incubator.
- Place about 20 oocytes into CZB-CB (enucleation medium) and keep in this medium at least 5 min before starting enucleation.
- Find the metaphase II spindle inside the oocyte. Without any staining, the spindle can be recognized under Nomarski or Hoffman optics. Locate the spindle between the 2 and 4 o'clock positions and then hold on the holding pipette (Fig. 4A).
- Using a few piezo pulses, cut the zona pellucida (Fig. 4B). To avoid damaging the oocyte by piezo pulses, make a large space between the zona pellucida and the oolemma.
- Insert the enucleation pipette into the oocyte without breaking the oolemma (Fig. 4C) and remove the metaphase II spindle by aspirating with a minimal volume of oocyte cytoplasm. Oocyte membrane and spindle must be pinched off slowly, do not apply piezo pulses to cut the membrane (Figs. 4D and 4E).
- Wash the enucleated oocytes several times to remove cytochalasin B completely and keep in KSOM medium in the incubator until used for donor cell injection.
D. Donor Cell Preparation
- Choose the cell type: Cumulus cell (Wakayama et
al., 1998; Wakayama and Yanagimachi, 2001a), tail tip
cell (probably fibroblast; Wakayama and Yanagimachi,
1999b; Ogura et al., 2000a), Sertoli cell (Ogura et al.,
2000b), fetus cell (Wakayama and Yanagimachi, 2001b;
Ono et al., 2001), and ES cell (Wakayama et al., 1999)
have been successful in producing cloned mice. The
methods are slightly different among those cell types,
as shown in Table II. Cumulus cells are easy to prepare
as donors. However, tail tip cells must be prepared at
least 1 week before nuclear transfer, and then single
cell treatment is required.
- To make single cells, remove cells from culture flask or dish by trypsin treatment. Because trypsin is very toxic at the time of nuclear injection, donor cells must be centrifuged at least three times to remove trypsin completely. However, cumulus cells can be used immediately without any treatment.
- For diffusing donor cells, pick up 1-3µl donor cell suspension and introduce into a CZB-PVP drop on the micromanipulation chamber (Fig. 3). Mix the donor cells and PVP medium gently using sharp tweezers. If there is not enough mixture, donor cells stick to each other and it becomes difficult to pick up a single cell (Fig. 5A). Do not scratch the bottom of the chamber.
 |
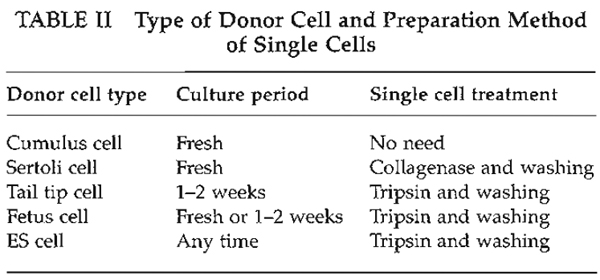
| FIGURE 5 Donor nucleus injection. (A and B) Donor nuclei are aspirated in and out of the injection pipette gently until their nuclei are largely devoid of visible cytoplasmic material. (C) Hold the enucleated oocyte and cut the zona pellucida using piezo pulses. (D) Insert the injection pipette into enucleated oocyte. (E) Apply a single piezo pulse to break the membrane and immediately inject the donor nucleus. (F) Pull the pipette away gently. |
E. Donor Cell Nucleus Injection
- Place about 20 enucleated oocytes into CZB-HEPES (injection medium, Fig. 3).
- Remove donor nuclei from cells and gently aspirate in and out of the injection pipette until the nucleus is devoid of visible cytoplasmic material (Figs. 5A and 5B). Put a few nuclei within the injection pipette.
- Hold an enucleated oocyte using the holding pipette.
- Cut the zona pellucida using a few piezo pulses as described in the enucleation method (Fig. 5C).
- Push one nucleus forward until it is near the tip of the pipette and then advance the pipette through the enucleated oocyte until it almost reaches the opposite side of the oocyte cortex (Fig. 5D).
- Apply one piezo pulse to puncture the oolemma at the pipette tip, which is indicated by a rapid relaxation of the oocyte membrane (Fig. 5E). Expel a donor nucleus into the enucleated oocyte cytoplasm immediately with a minimal amount of PVP medium. Gently withdraw the injection pipette from the oocyte (Fig. 5F).
- After injection, leave the injected oocyte for at least 10min at room temperature. Then transfer the oocytes into KSOM medium and store in the incubator until they are activated with strontium.
 |
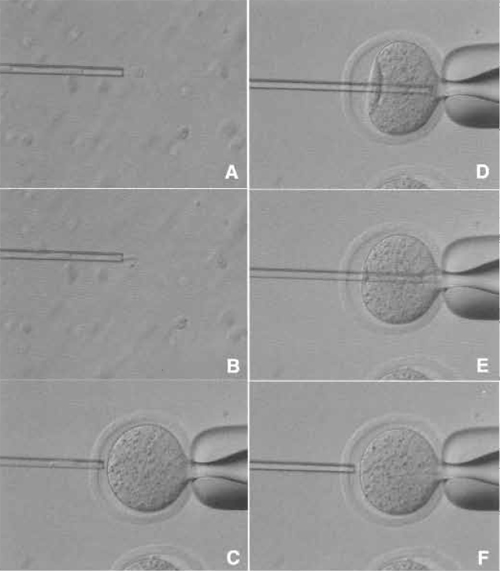
| FIGURE 6 Reconstructed oocyte activation medium. Above the line is CZB-Sr medium, which activate the oocytes. The top two drops are used for washing oocytes to remove calcium from medium. Under the line is KSOM medium. The top two drops are used for washing activated oocytes and to remove A strontium and cytochalasin B. |
- Nuclear transferred oocytes should be cultured in KSOM medium for at least 30min before activation. During this time, donor nuclei may be reprogrammed under oocyte cytoplasm (Wakayama et al., 1998, 2000b).
- Activate the oocytes in CZB-Sr medium for 6 h with medium containing 2-10mM strontium chloride and 5µg/ml cytochalasin B (Fig. 6). Strontium activates oocytes, and cytochalasin B prevents extrusion of the donor chromosomes as a polar body (Wakayama et al., 1998).
- Following activation, transfer all embryos and wash several times in KSOM medium to remove cytochalasin B completely (Wakayama and Yanagimachi, 2001b). Then culture until cloned embryos develop to the blastocyst stage. "Rarely, cytochalasin B seeps from activation drops and prevents cloned embryo development. In this case, it is better to culture all cloned embryo in another dish." These embryos may develop to full term when transferred into a pseudo-pregnant mother with about a 1-2% success rate (Wakayama and Yanagimachi, 2001a).
G. Establishment of ntES Cell Line from Cloned Blastocysts
- To make an embryonic feeder cell collect day 12.5 to 13.5 dpc fetuses from pregnant mother and then remove the head and internal organs on a 10-cm petri dish containing PBS. Place the embryos into a new 10- cm dish and mince the embryos into very small pieces with sterile scissors. Add 25 ml DMEM medium and plate into a larger size (175-cm2) tissue culture flask. One or 2 days later, split the cells 1:5 by trypsinization and allow them to grow to confluence.
- Mitomycin C treatment. When the cells become confluent, treat with 10µg/ml mitomycin C for 2h in an incubator. Wash the flask several times with PBS to remove mitomycin C and then collect the cells by trypsinization. Pellet the cells by centrifugation (1000rpm for 10min). Aspirate the supernatant and gently resuspend the cell pellet in freezing medium (final concentration about l× 106 cells/ml) and divide into cryovials. Place the vials in a -80°C freezer overnight; the next day, vials can be transferred to liquid nitrogen for long-term storage.
- Thaw the vial quickly and transfer cells into a 15- ml tube filled with ES medium. Pellet the cells by centrifuging at 1000rpm for 10min and then aspirate the supernatant and resuspend with fresh ES medium. Plate on a 96-well multidish and culture in an incubator until use. This feeder cell preparation should be done at least 1 day before plating the cloned blastocysts.
- Remove the zona pellucida from the cloned blastocysts using acidic tyrode solution. The zona pellucida dissolves quickly within 30 s.
- Wash the cloned blastocysts several times in KSOM medium and then plate them into a 96-well multidish containing a performed feeder layer. Culture the multidish about 10 days. During this period, cloned blastocysts attach to the surface of the feeder layer and the inner cell mass (ICM) can be seen to grow (Figs. 7A and 7B).
- Some wells of the multidish may have clumps of large ICM (Fig. 7C). If these clumps appear, treat with trypsin and disaggregate the clump using a 200µl pipettor (Nagy et al., 2003). Then replate the suspension into another well of the same multidish. Several days later, if ICM-like clumps appear on the dish, replate again the same as before.
- When ES-like cell colonies dominate the well (Fig. 7D), the cells should be expanded gradually into 48-, 24-, and 12-wells and then into 12.5-, 25-, and 75- cm2 flasks. After the cell number has increased greatly, freeze and store the cells the same as feeder cells.
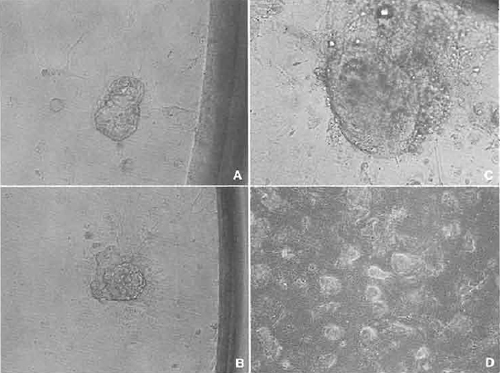 |
| FIGURE 7 Establishment of ntES cell line. (A) A cloned blastocyst was attached to the feeder cell in the 96-well dish. (B) Spreading the trophoblast cells and an inner cell mass (ICM) appearing. (C) ICM grew up almost 5 to 10 times as large. (D) After trypsinization, some wells show a nearly established ntES cell line. |
IV. COMMENTS
- So far many types of somatic cell have been used as donors, but only a few cell types have demonstrated the capacity of full-term developments.
- For nuclear transfer, only 100 to 150 cells were used as donors. However, to pick up better cells, donor cells must be prepared with high concentrations (more than 105 cells) on the manipulation chamber.
- When using cumulus cells, these cells can be picked up immediately after collection without washing, as hyaluronidase is not toxic for oocyte injection.
- Nuclear injection by piezo is a very new method and very difficult. However, this is almost the same method as sperm injection into oocytes. You should begin with the sperm injection experiment before starting the nuclear transfer experiment. Sperm injection will help you understand the mechanisms of the piezo system.
V. PITFALLS
- Washing the pipette by PVP is very important. This process affects not only the survival rate, but also development after nuclear transfer.
- During strontium treatment, some eggs die and the medium becames dirty. This is a normal process and surviving oocytes suffer no damage by strontium treatment.
- It will probably take a few months to generate data due to incomplete technical skills (Perry et al., 2002). Without hard practice, the establishment of a ntES cell line is impossible.
References
Chatot, C. L., Lewis, J. L., Torres, I., and Ziomek, C. A. (1990). Development of 1-cell embryos from different strains of mice in CZB medium. Biol. Reprod. 42, 432-440.
Munsie, M. J., Michalska, A. E., O'Brien, C. M., Trounson, A. O., Pera, M. E, and Mountford, P. S. (2000). Isolation of pluripotent embryonic stem cells from reprogrammed adult mouse somatic cell nuclei. Curr. Biol. 10, 989-992.
Nagy, A., Gertsenstein, M., Vintersten, K., and Behringer, R. (2003). Manipulating the Mouse Embryo, 3rd Ed. Cold Spring Harbor Laboratory Press, Cold Spring Harbor, NY.
Ogura, A., Inoue, K., Ogonuki, N., Noguchi, A., Takano, K., Nagano, R., Suzuki, O., Lee, J., Ishino, E, and Matsuda, J. (2000a). Production of male cloned mice from fresh, cultured, and cryopreserved immature sertoli cells. Biol. Reprod. 62, 1579-1584.
Ogura, A., Inoue, K., Takano, K., Wakayama, T., and Yanagimachi, R. (2000b). Birth of mice after nuclear transfer by electrofusion using tail tip cells. Mol. Reprod. Dev. 57, 55-59.
Ono, Y., Shimozawa, N., Ito, M., and Kono, T. (2001). Cloned mice from fetal fibroblast cells arrested at metaphase by a serial nuclear transfer. Biol. Reprod. 64, 44-50.
Perry, A. C., and Wakayama, T. (2002). Untimely ends and new beginnings in mouse cloning. Nature Genet. 30, 243-244.
Rideout, W. M., III, Hochedlinger, K., Kyba, M., Daley, G. Q., and Jaenisch, R. (2002). Correction of a genetic defect by nuclear transplantation and combined cell and gene therapy. Cell 109, 17-27.
Wakayama, S., Kishigami, S., Van, Thuan, N., Ohta, H., Hikichi, T., Mizutani, E., Yanagimachi, R. and Wakayama, T. (2005) Propagation of an Infertile Hermaphrodite Mouse Lacking Germ Cells, Using Nuclear Transfer and Embryonic Stem Cell Technology. Proc. Natl. Acad. Sci. USA 102, 29-33.
Wakayama, S., Ohta, H., Kishigami, S., Van, Thuan, N., Hikichi, T., Mizutani, E., Miyake, M. and Wakayama, T. (2005) Establishment of Male and Female Nuclear Transfer Embryonic Stem Cell Lines from Different Mouse Strains and Tissues. Biol. Reprod. In press.
Wakayama, T., and Perry, A. C. E (2002). Cloning mice: Perspective and prospective. In "Principles of Cloning" (J. Cibelli, R. P. Lanza, K. H. S. Campbell, and M. D. West, eds.), pp. 301-341. Academic Press, San Diego.
Wakayama, T., Perry, A. C. E, Zuccotti, M., and Yanagimachi, R. (1998). Full term development of mice from enucleated oocytes injected with cumulus cell nuclei. Nature 394, 369-374.
Wakayama, T., Rodriguez, I., Perry, A. C. E, Yanagimachi, R., and Mombaerts, P. (1999). Mice cloned from embryonic stem cells. Proc. Natl. Acad. Sci. USA 26, 14984-14989.
Wakayama, T., Shinkai, Y., Tamashiro, K. L. K., Niida, H., Blanchard, D. C., Blanchard, R. J., Ogura, A., Tanemura, K., Tachibana, M., Perry, A. C. E, Colgan, D. E, Mombaerts, P., and Yanagimachi, R. (2000a). Cloning of mice to six generations. Nature 407, 318- 319.
Wakayama, T., Tabar, V., Rodriguez, I., Perry, A. C. E, Studer, L., and Mombaerts, P. (2001). Differentiation of embryonic stem cell lines generated from adult somatic cells by nuclear transfer. Science 292, 740-743.
Wakayama, T., Tateno, H., Mombaerts, P., and Yanagimachi, R. (2000b). Nuclear transfer into mouse zygotes. Nature Genet. 24, 108-109.
Wakayama, T., and Yanagimachi, R. (1999). Cloning of male mice from adult tail-tip cells. Nature Genet. 22, 127-128. Wakayama, T., and Yanagimachi, R. (2001a). Mouse cloning with nucleus donor cells of different age and type. Mol. Reprod. Dev. 58, 376-383.
Wakayama, T., and Yanagimachi, R. (2001b). Effect of cytokinesis inhibitor, DMSO and the timing of oocyte activation on mouse cloning using cumulus cell nuclei. Reproduction 122, 49-60.
Support our developers


